Google Tag Manager Integration
Installing the Uptick Tag Manager Template
Enhance your website effortlessly by integrating our Uptick implementation with Google Tag Manager. The setup is quick and easy, with the steps outlined below. By following them, you’ll seamlessly upgrade your website using Google Tag Manager tags through our custom integration.
Importing the Template into Google Tag Manager
Before you begin, make sure to download the required template, which you’ll need in step 5.
- Download the Uptick Tag Manager.tpl template file.
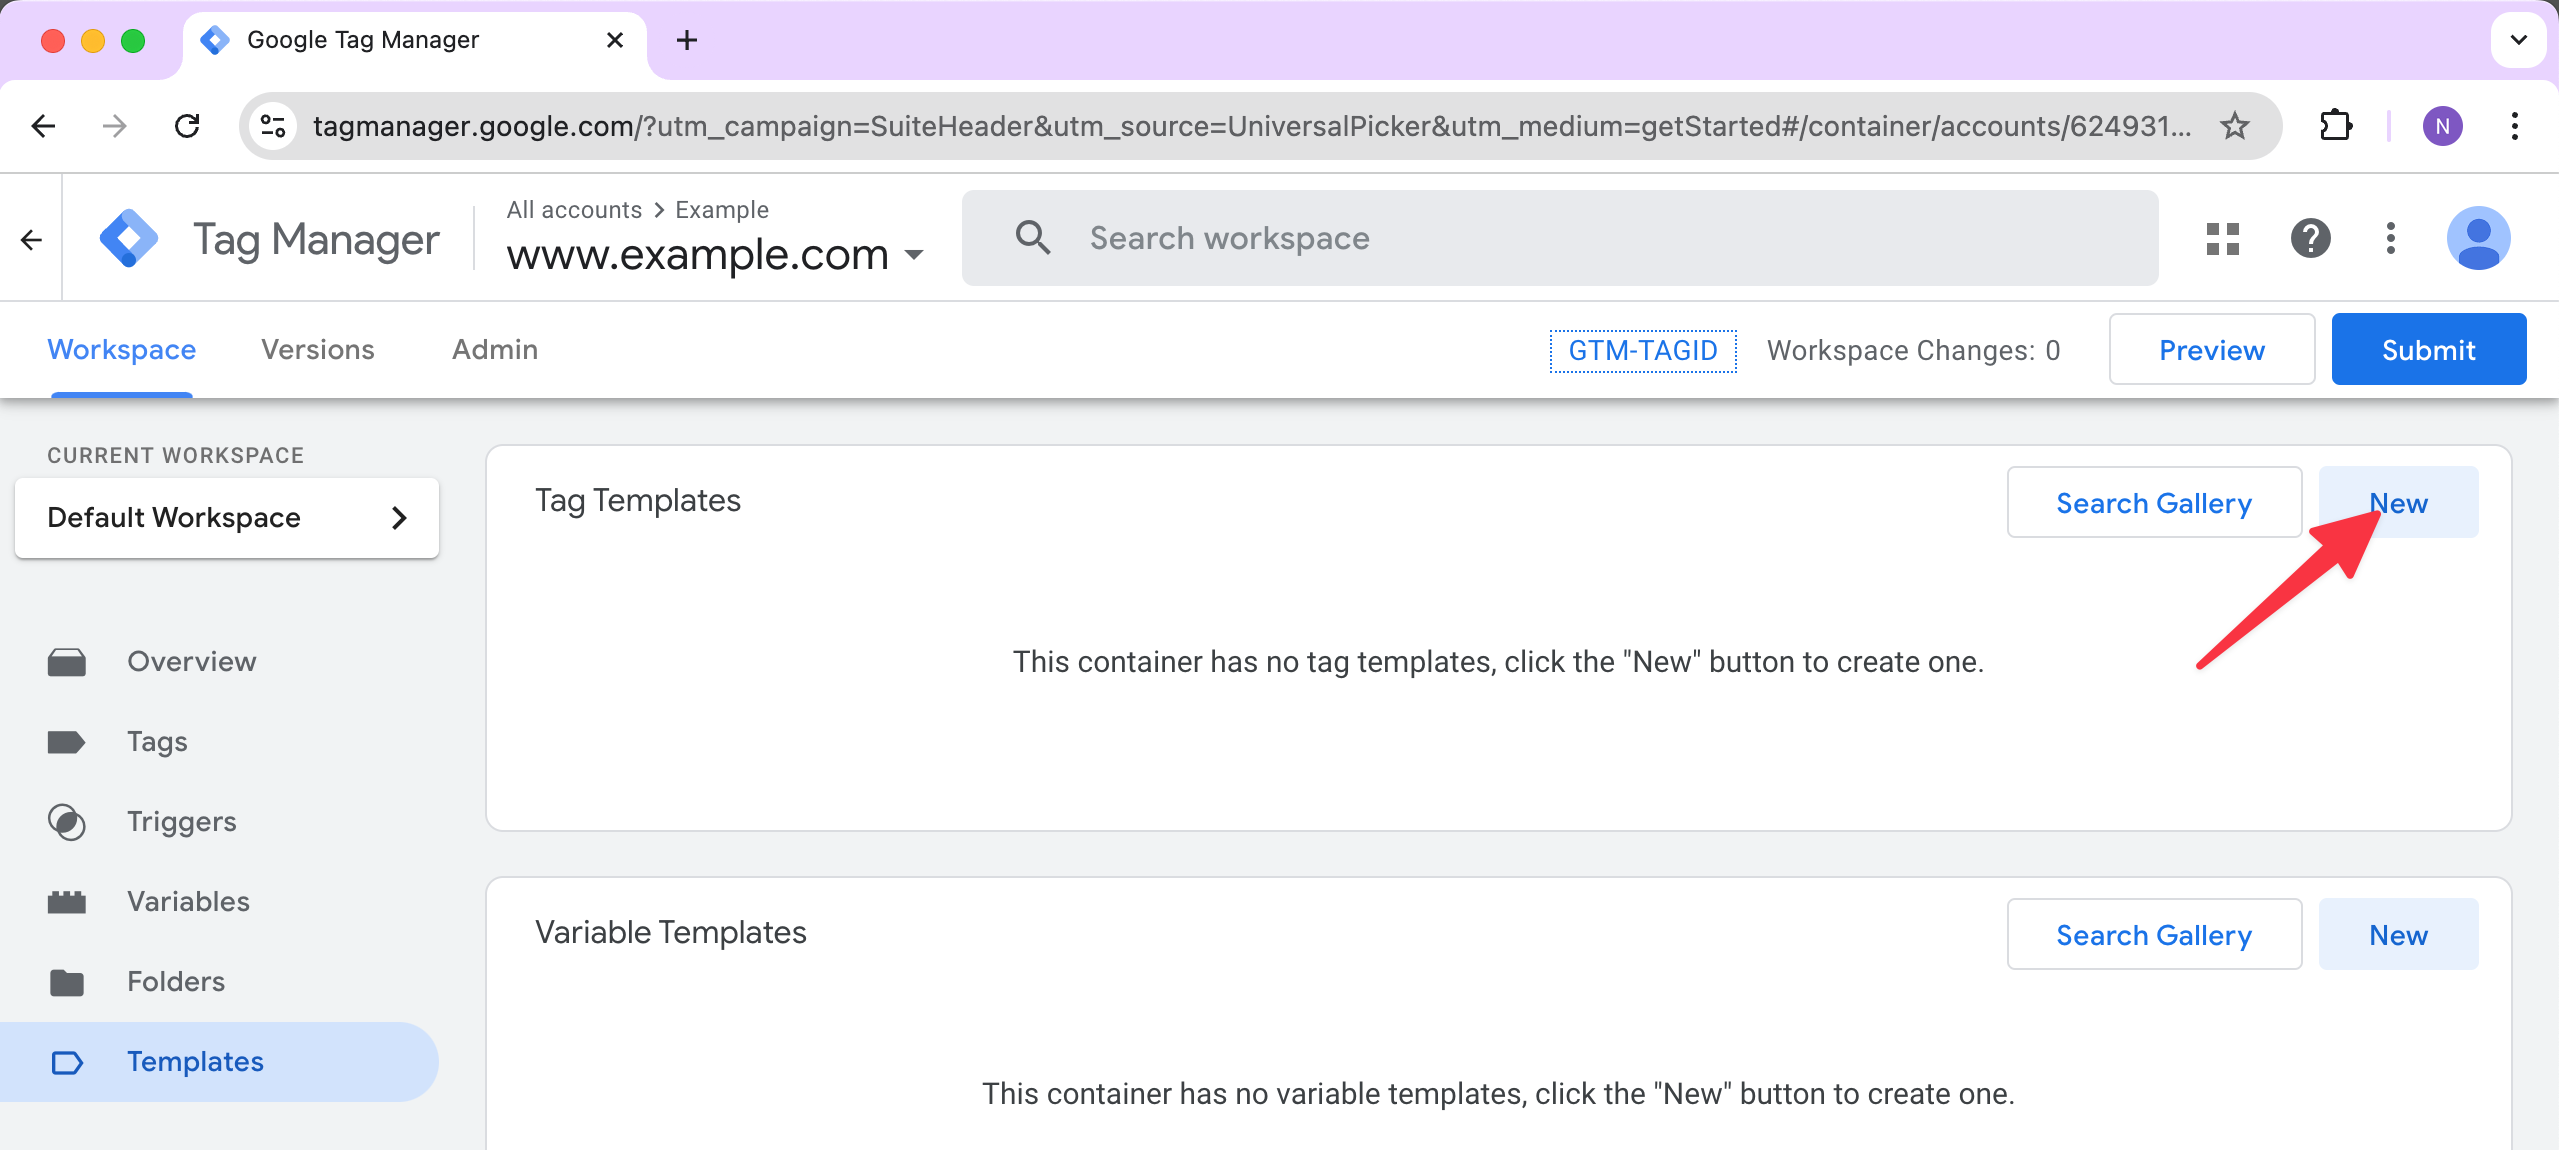
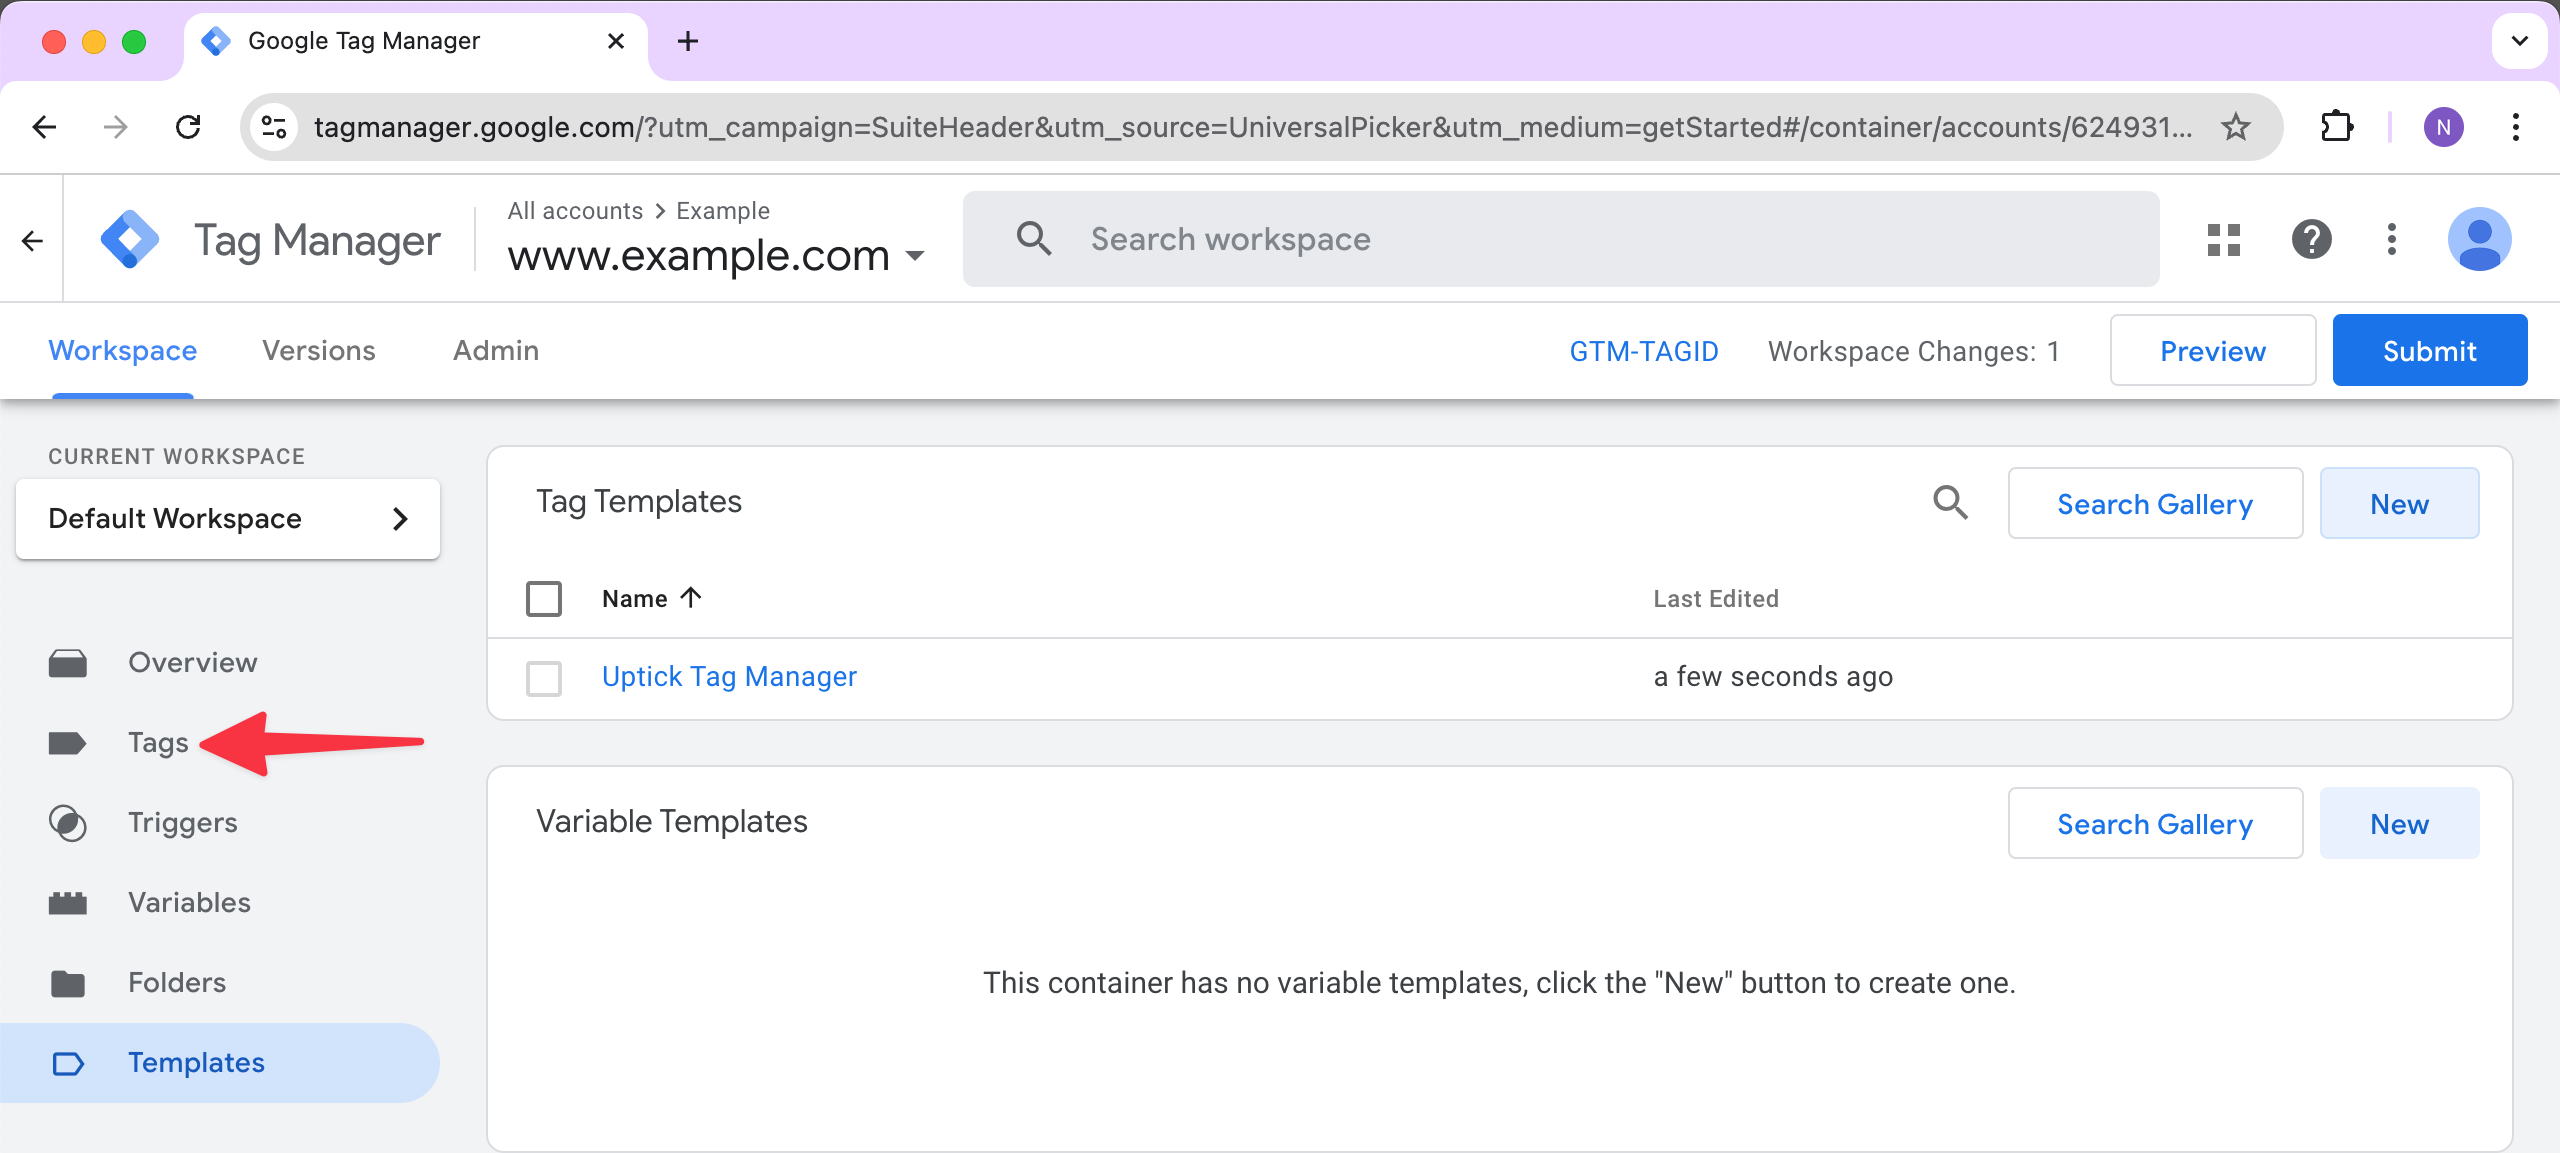
Step 1 - Go to Templates
In Google Tag Manager, click on “Templates” on the left sidebar.

Step 2 - Add a New Template
On the top right, click “New” under the Tag Templates section.
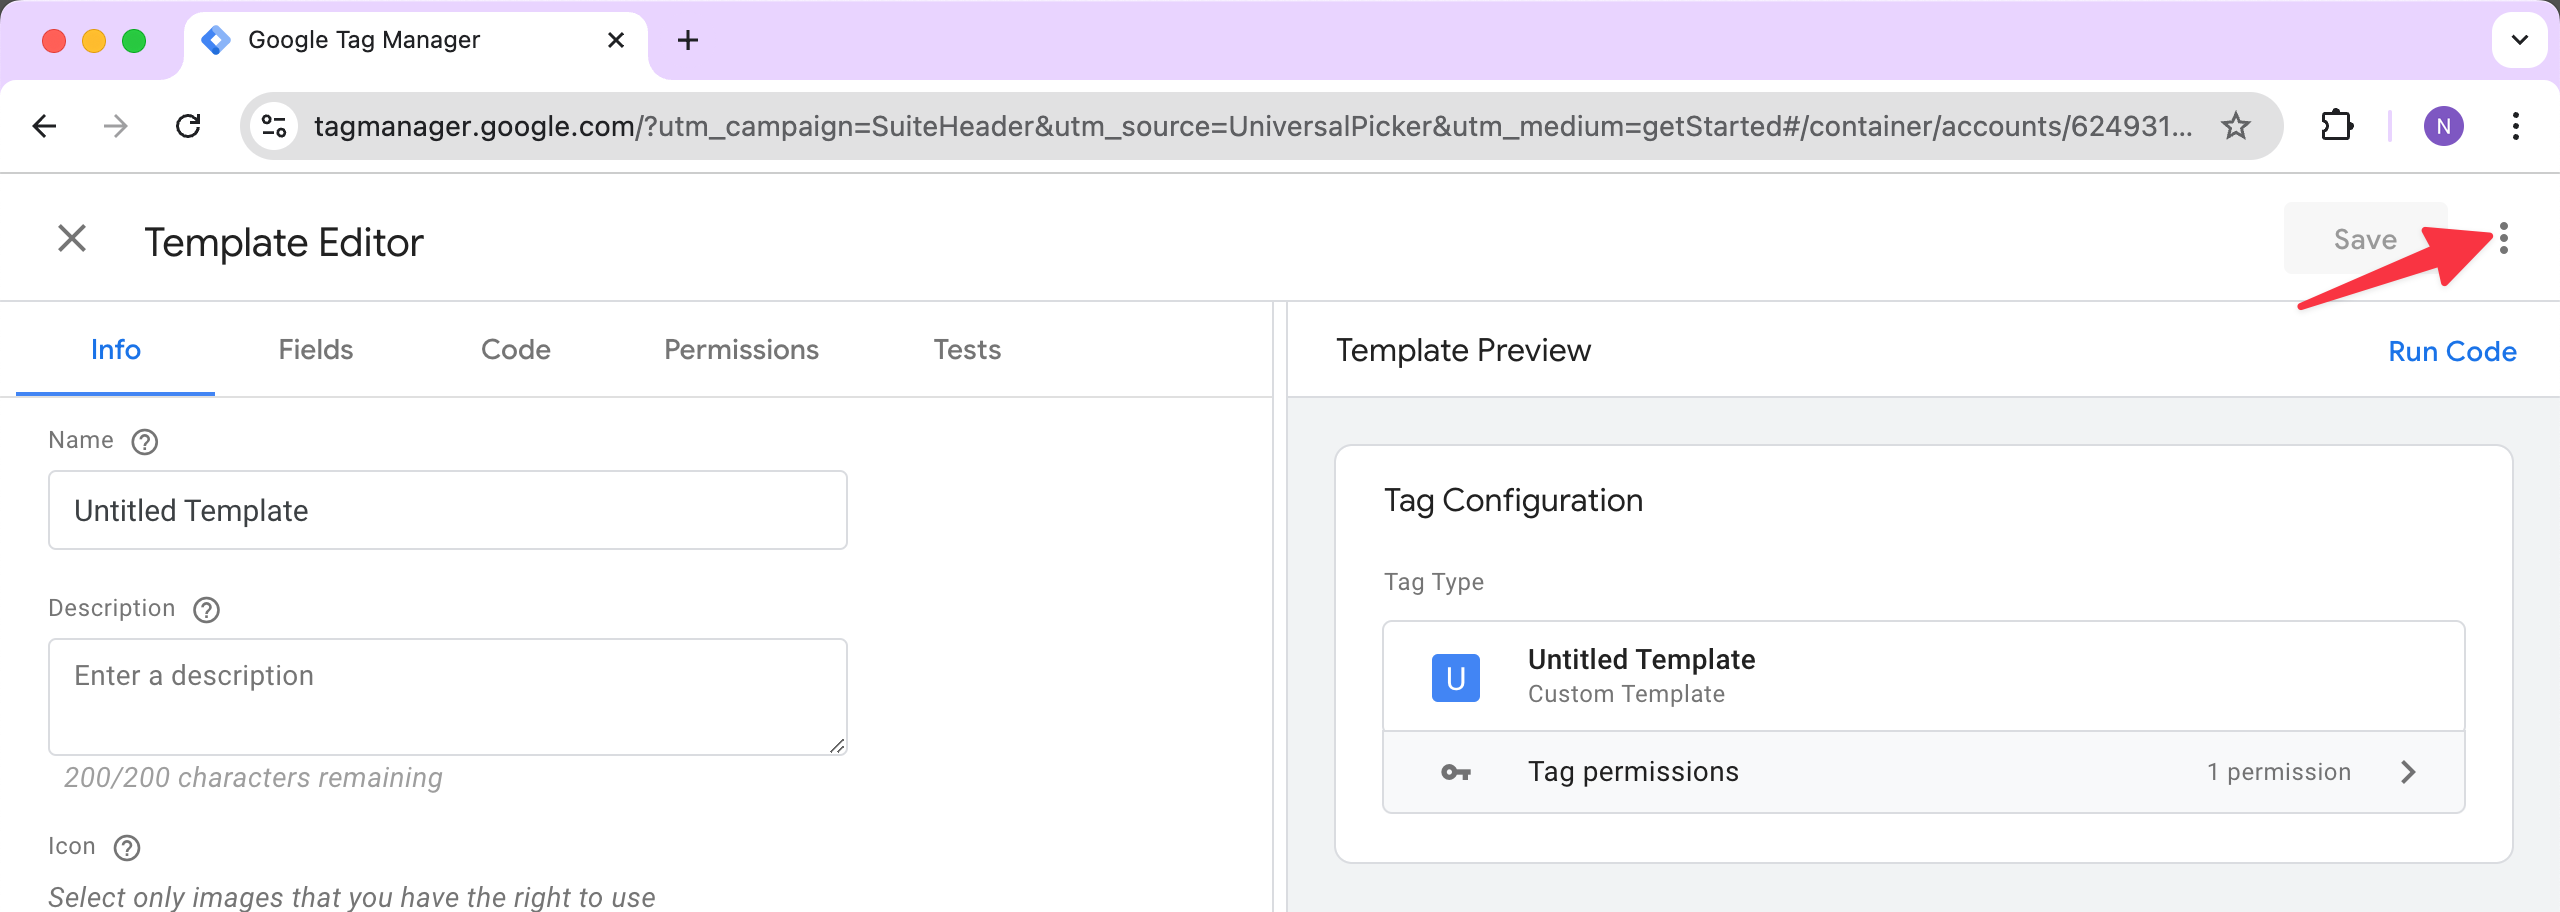
Step 3 - Open the Template Menu
click the three dots in the top right corner to open the dropdown menu.
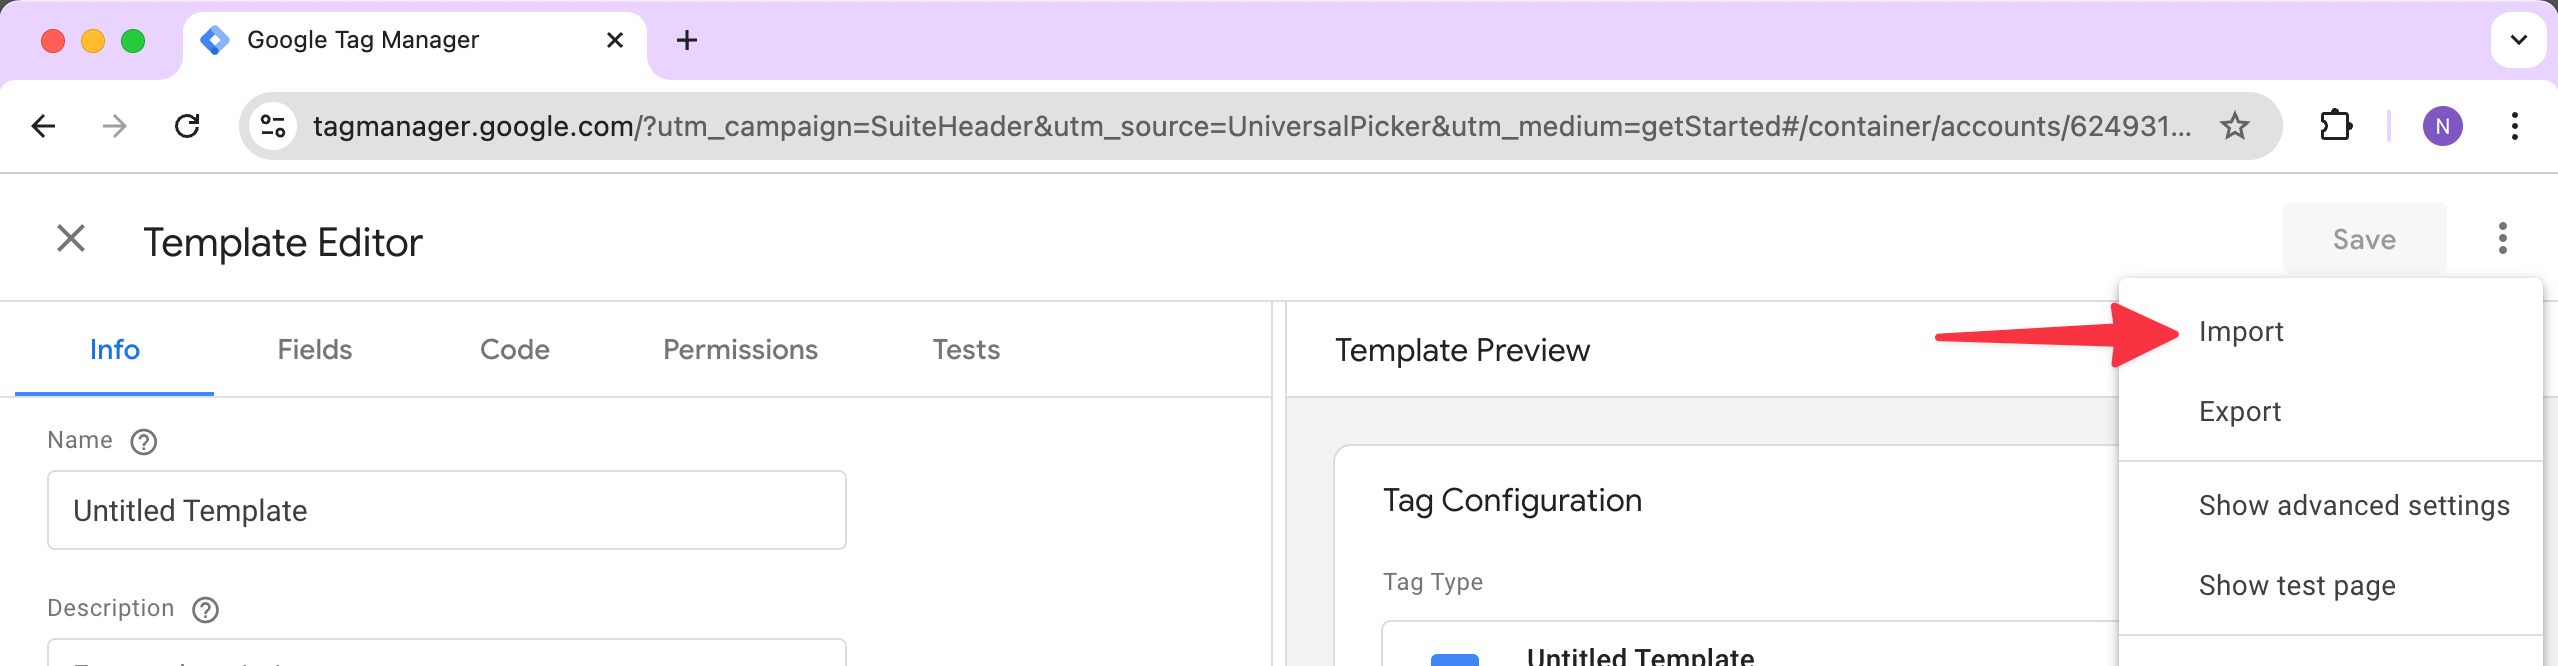
Step 4 - Import the Template
In the dropdown, select “Import” to open the file selection dialog.
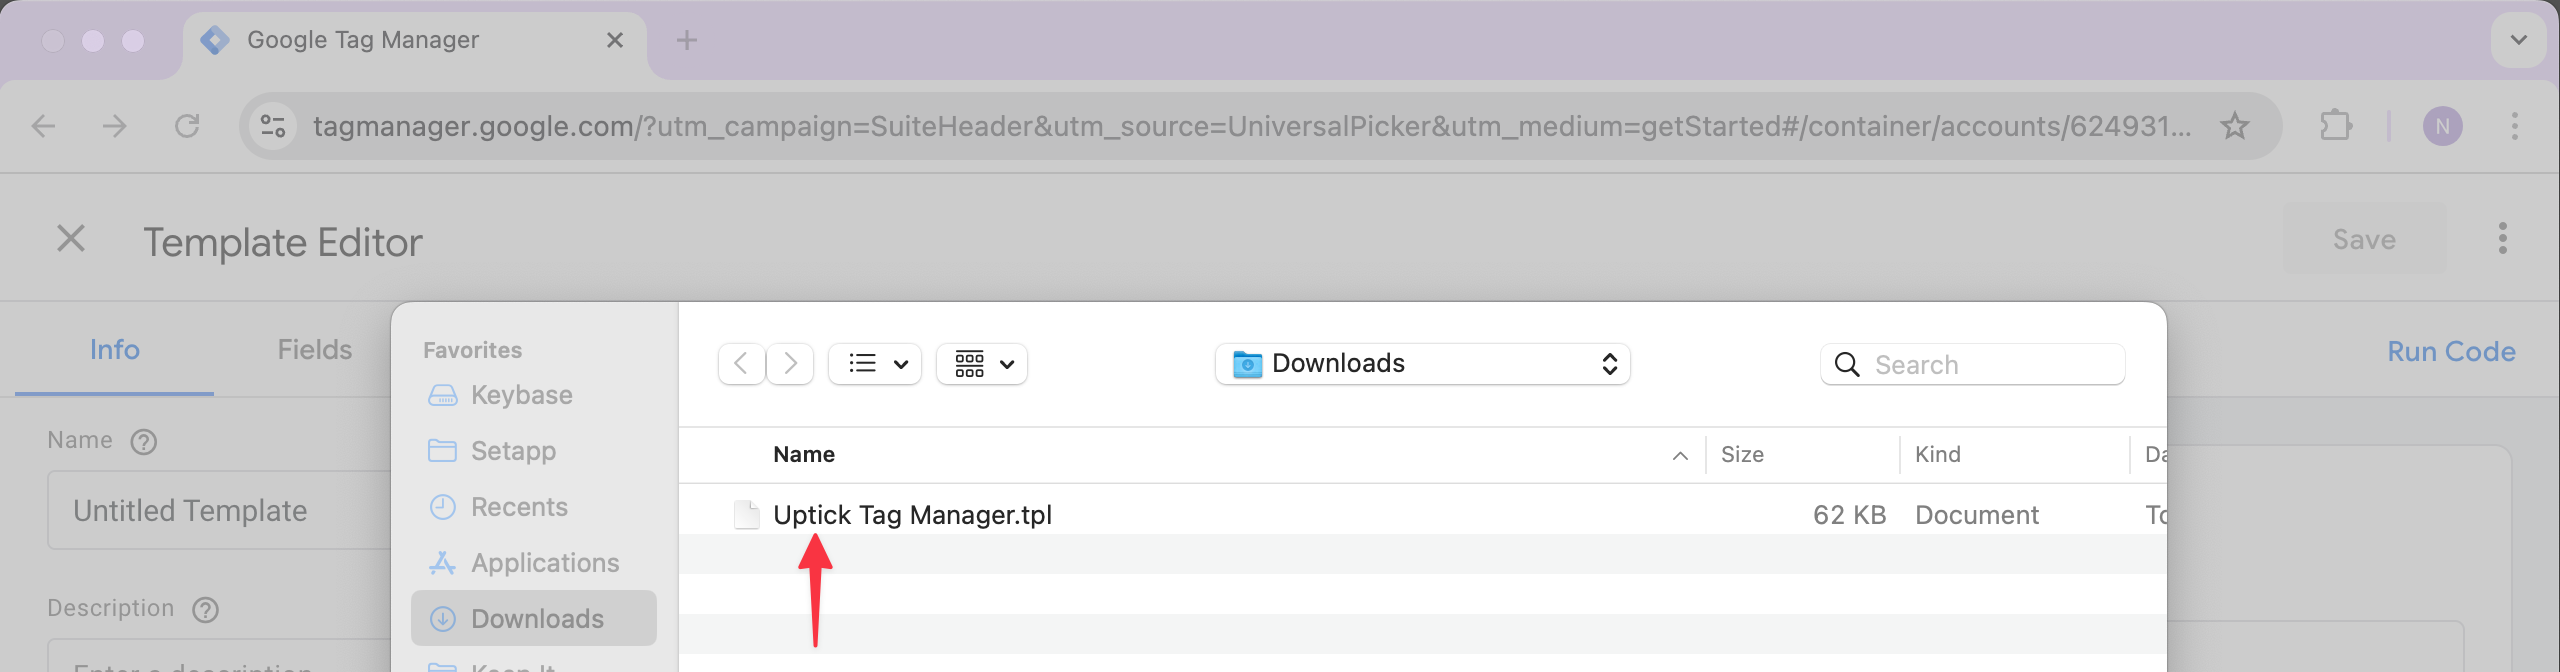
Step 5 - Select the Template
Choose the “Uptick Tag Manager.tpl” file you downloaded and click “Open”.
You can go to the download steps by clicking here
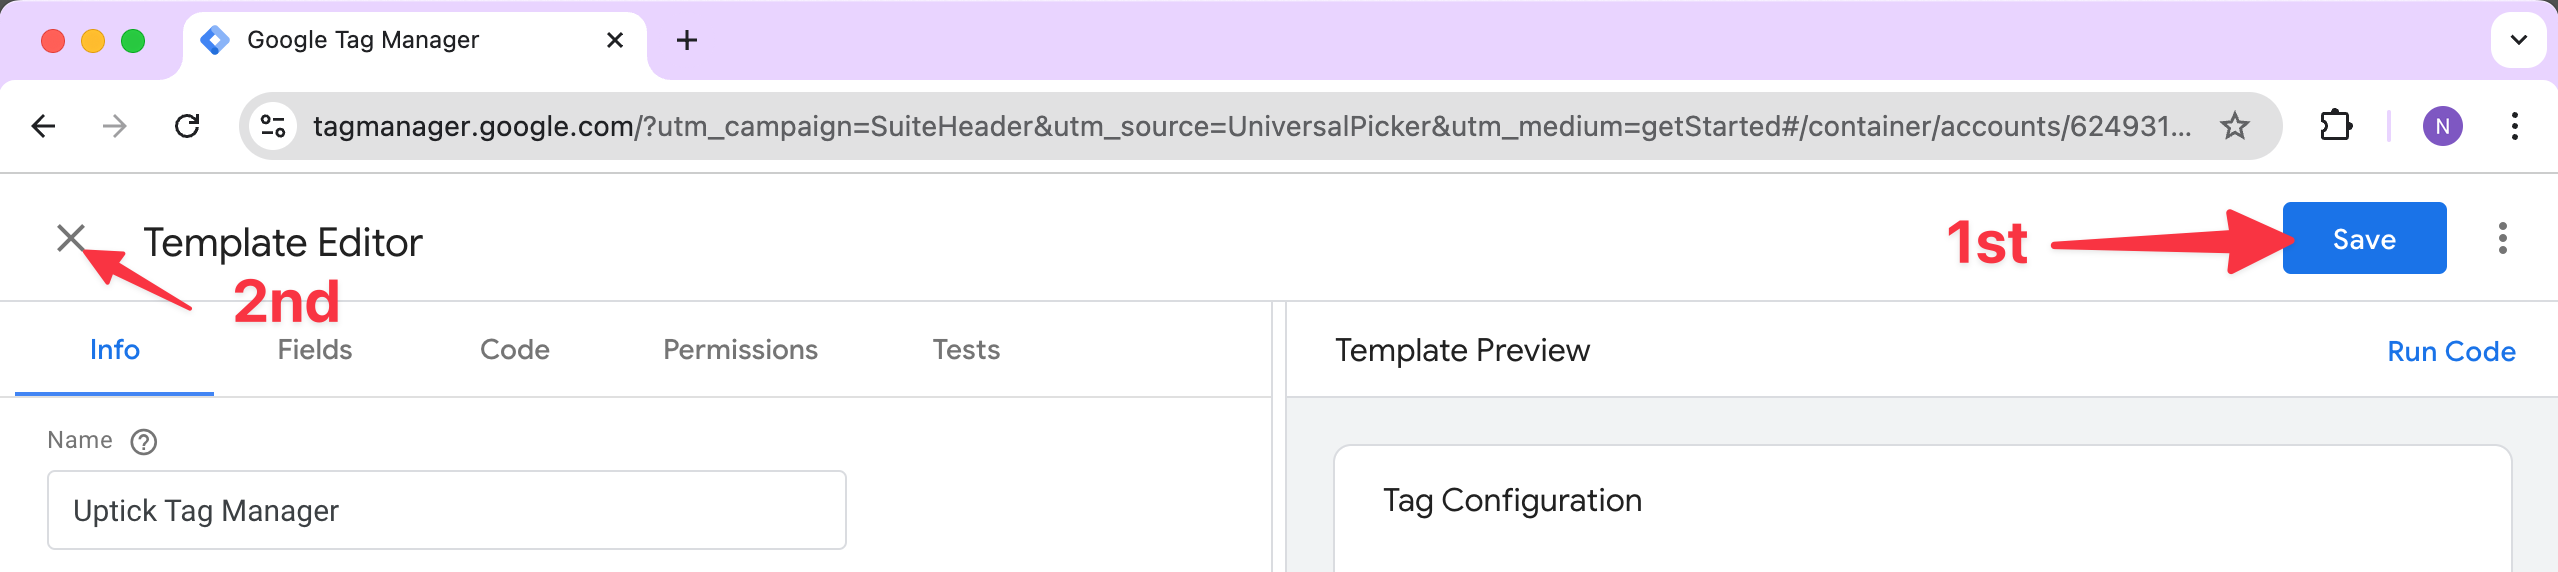
Step 6 - Save the Template
Once imported, click “Save”, then close the Template window by clicking the “X” on the top left corner.
Creating a new Tag in Google Tag Manager
Now that the template has been imported, follow these steps to create a new Tag to activate the Uptick integration on your website.
Step 7 - Go to Tags
Click “Tags” on the left sidebar.
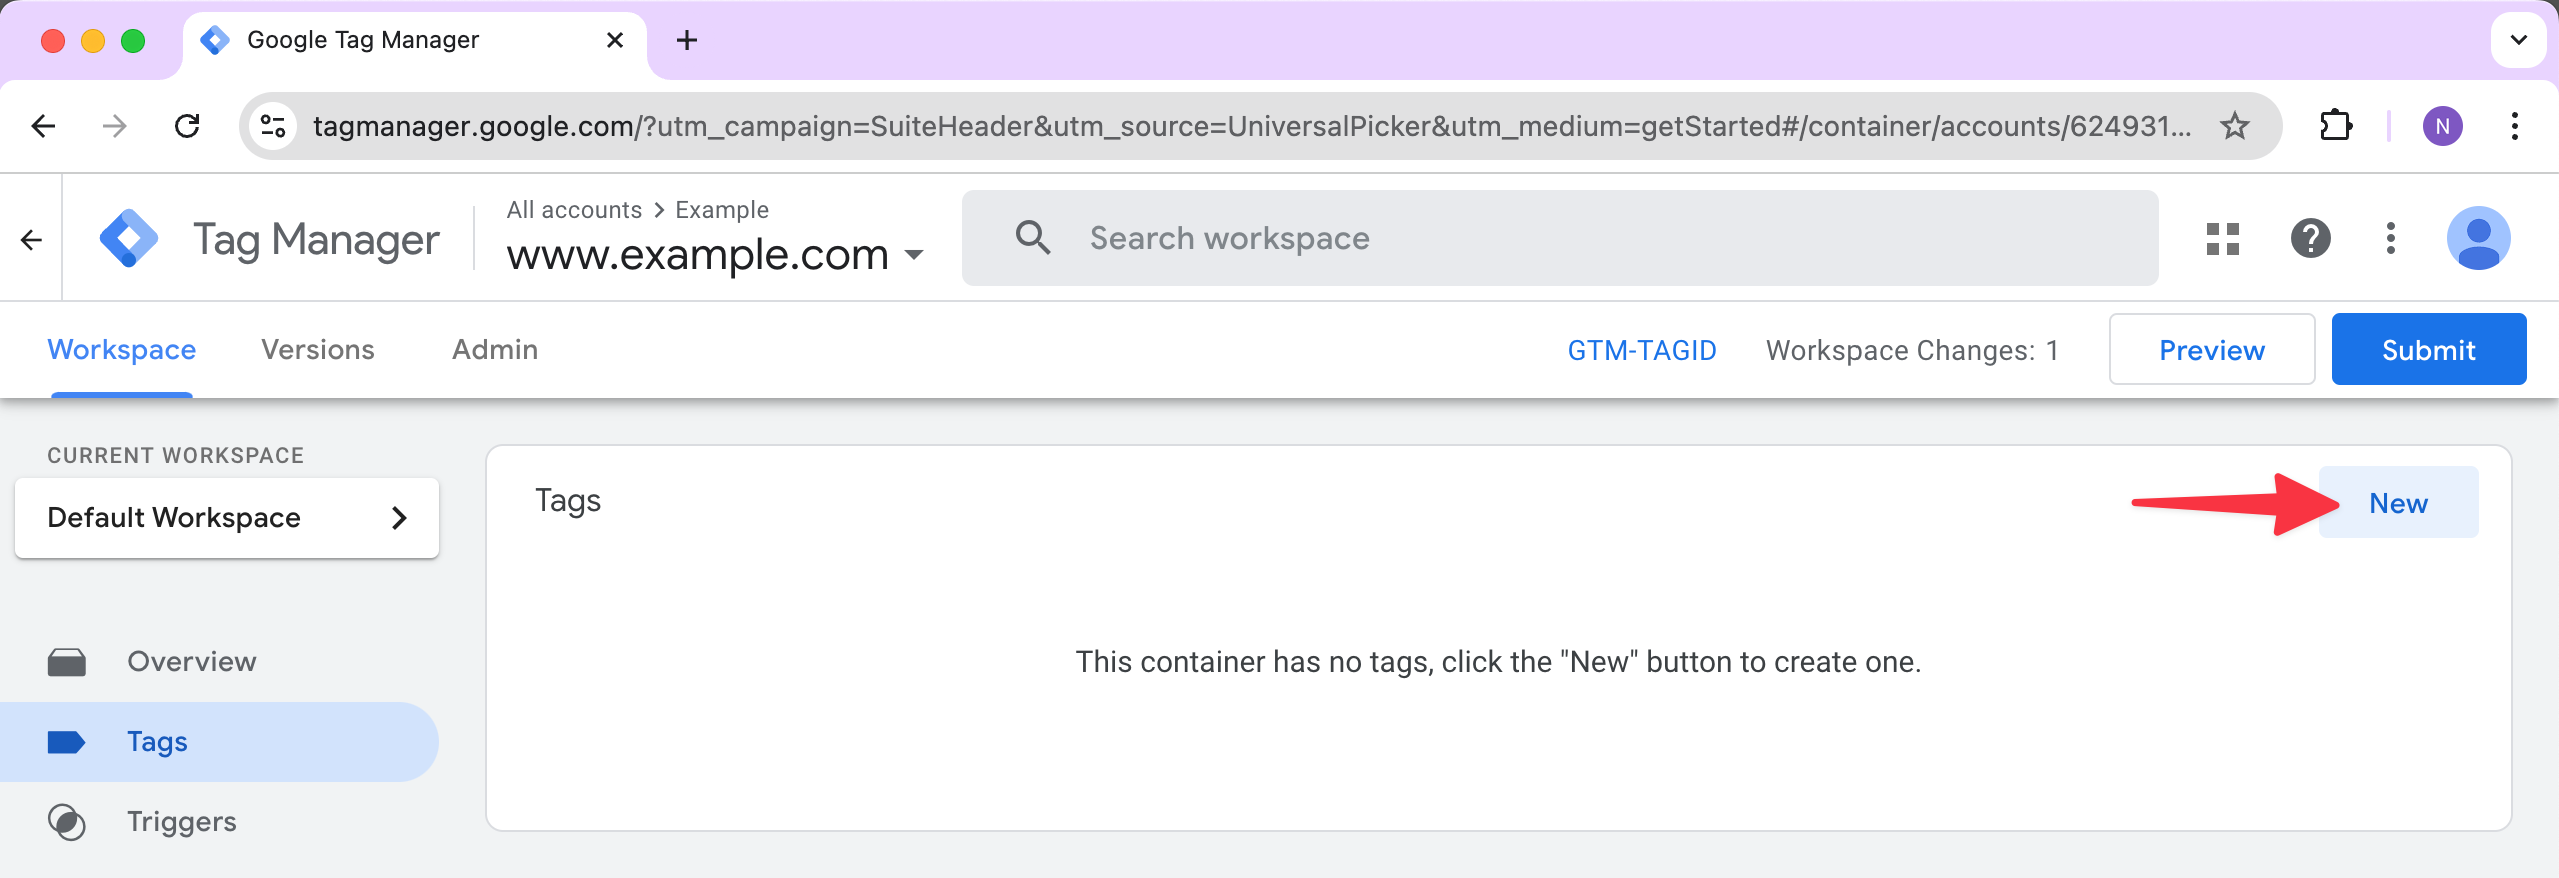
Step 8 - Create a new Tag
On the right side, click “New” to start create a new Tag.
Step 9 - Edit the Tag
In the new Tag box, hover over the “Tag Configuration” area until the pencil icon appears. Click the pencil to proceed.

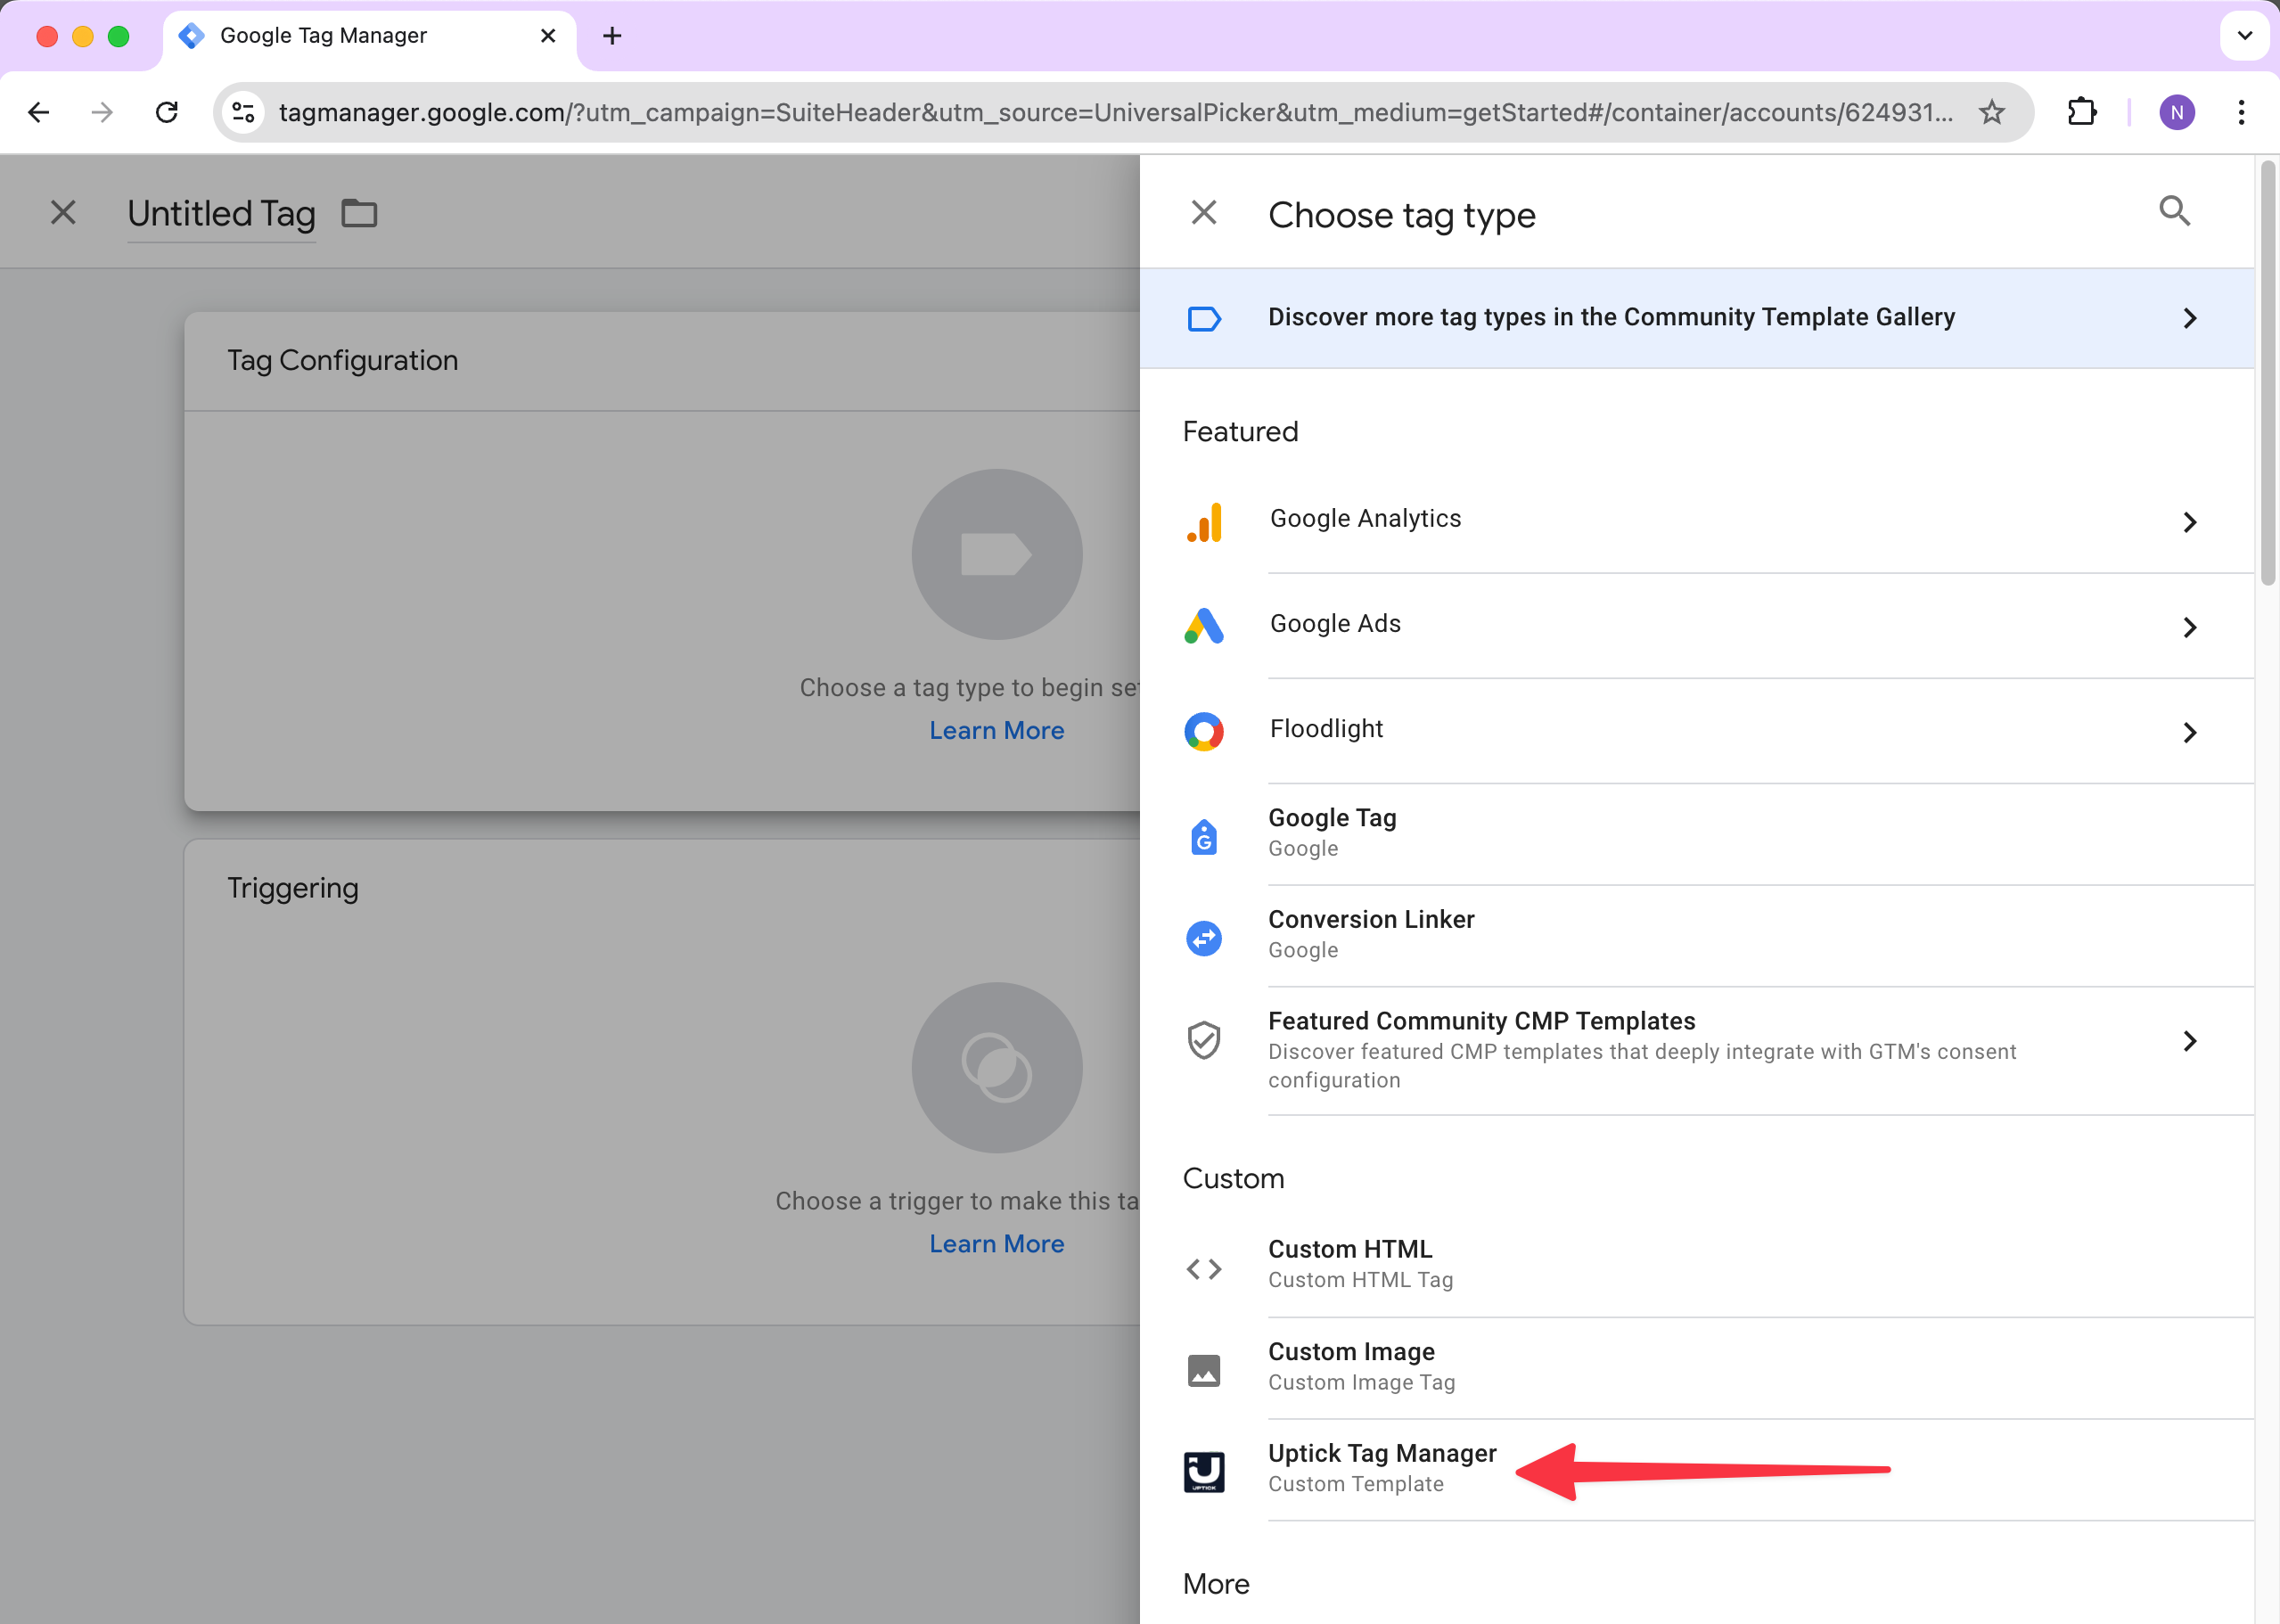
Step 10 - Select the Template
With the dialog menu open, scroll down and select “Uptick Tag Manager” from the list of options.
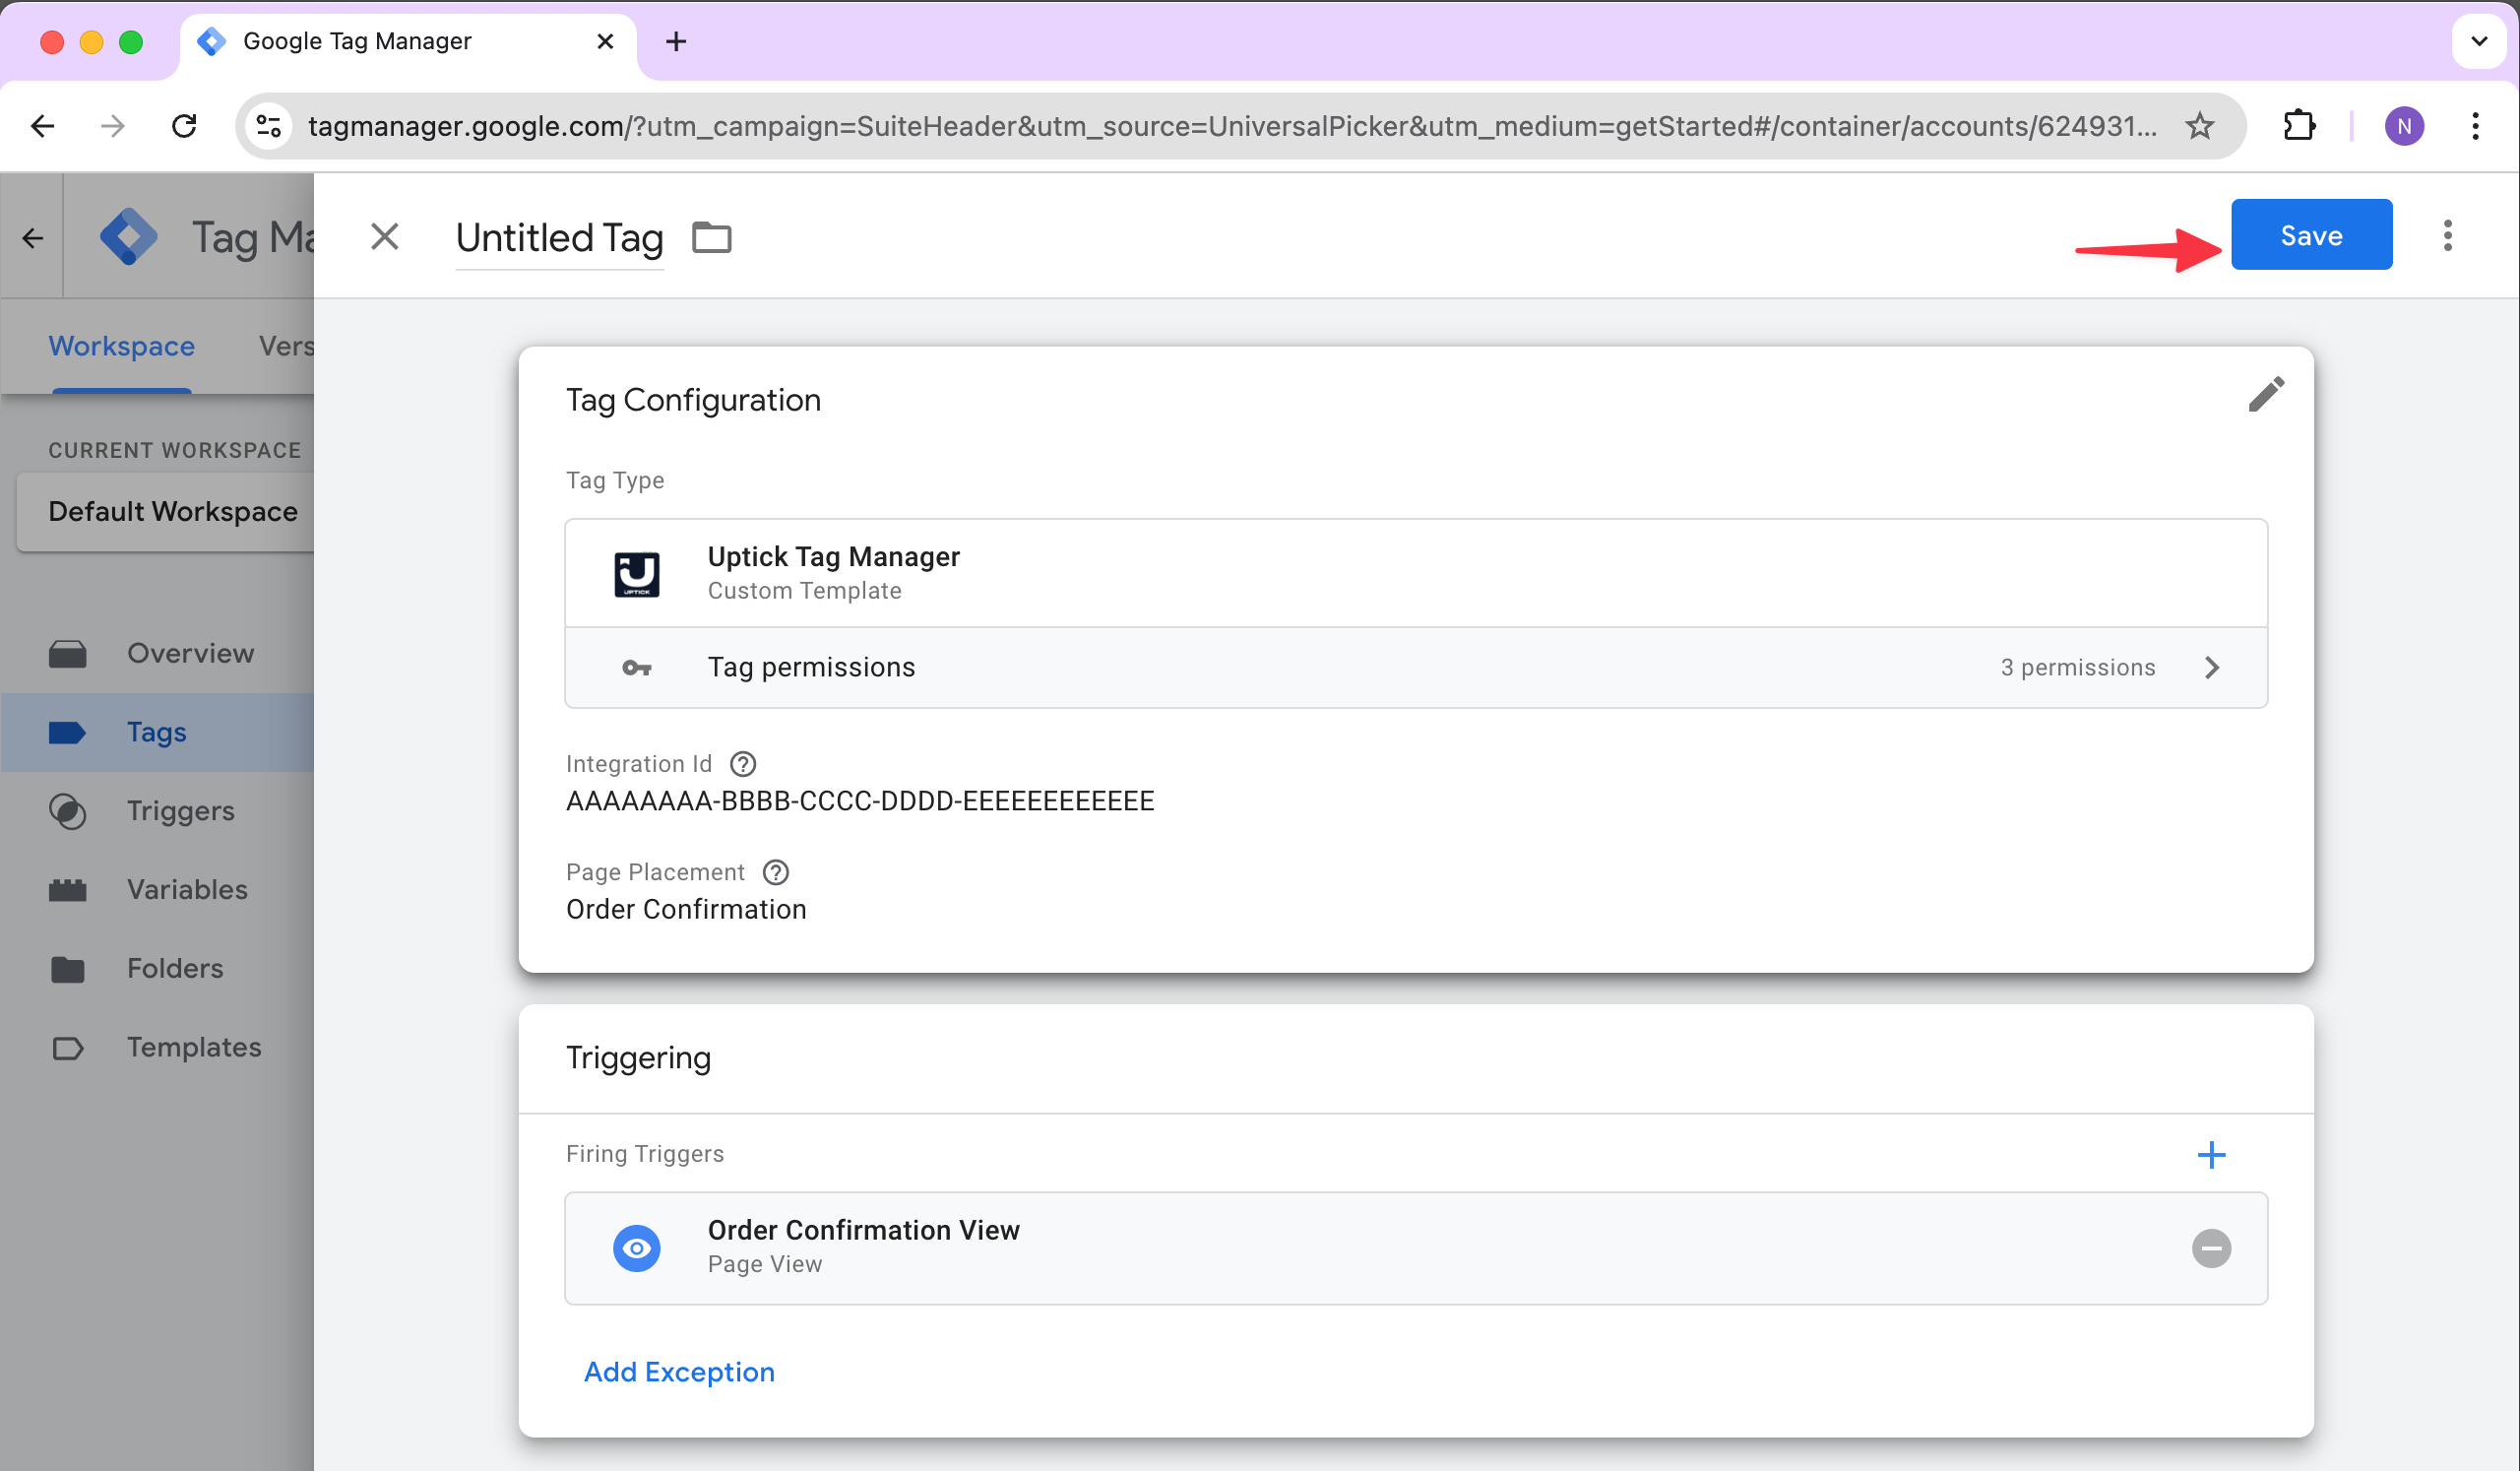
Step 11 - Add Settings
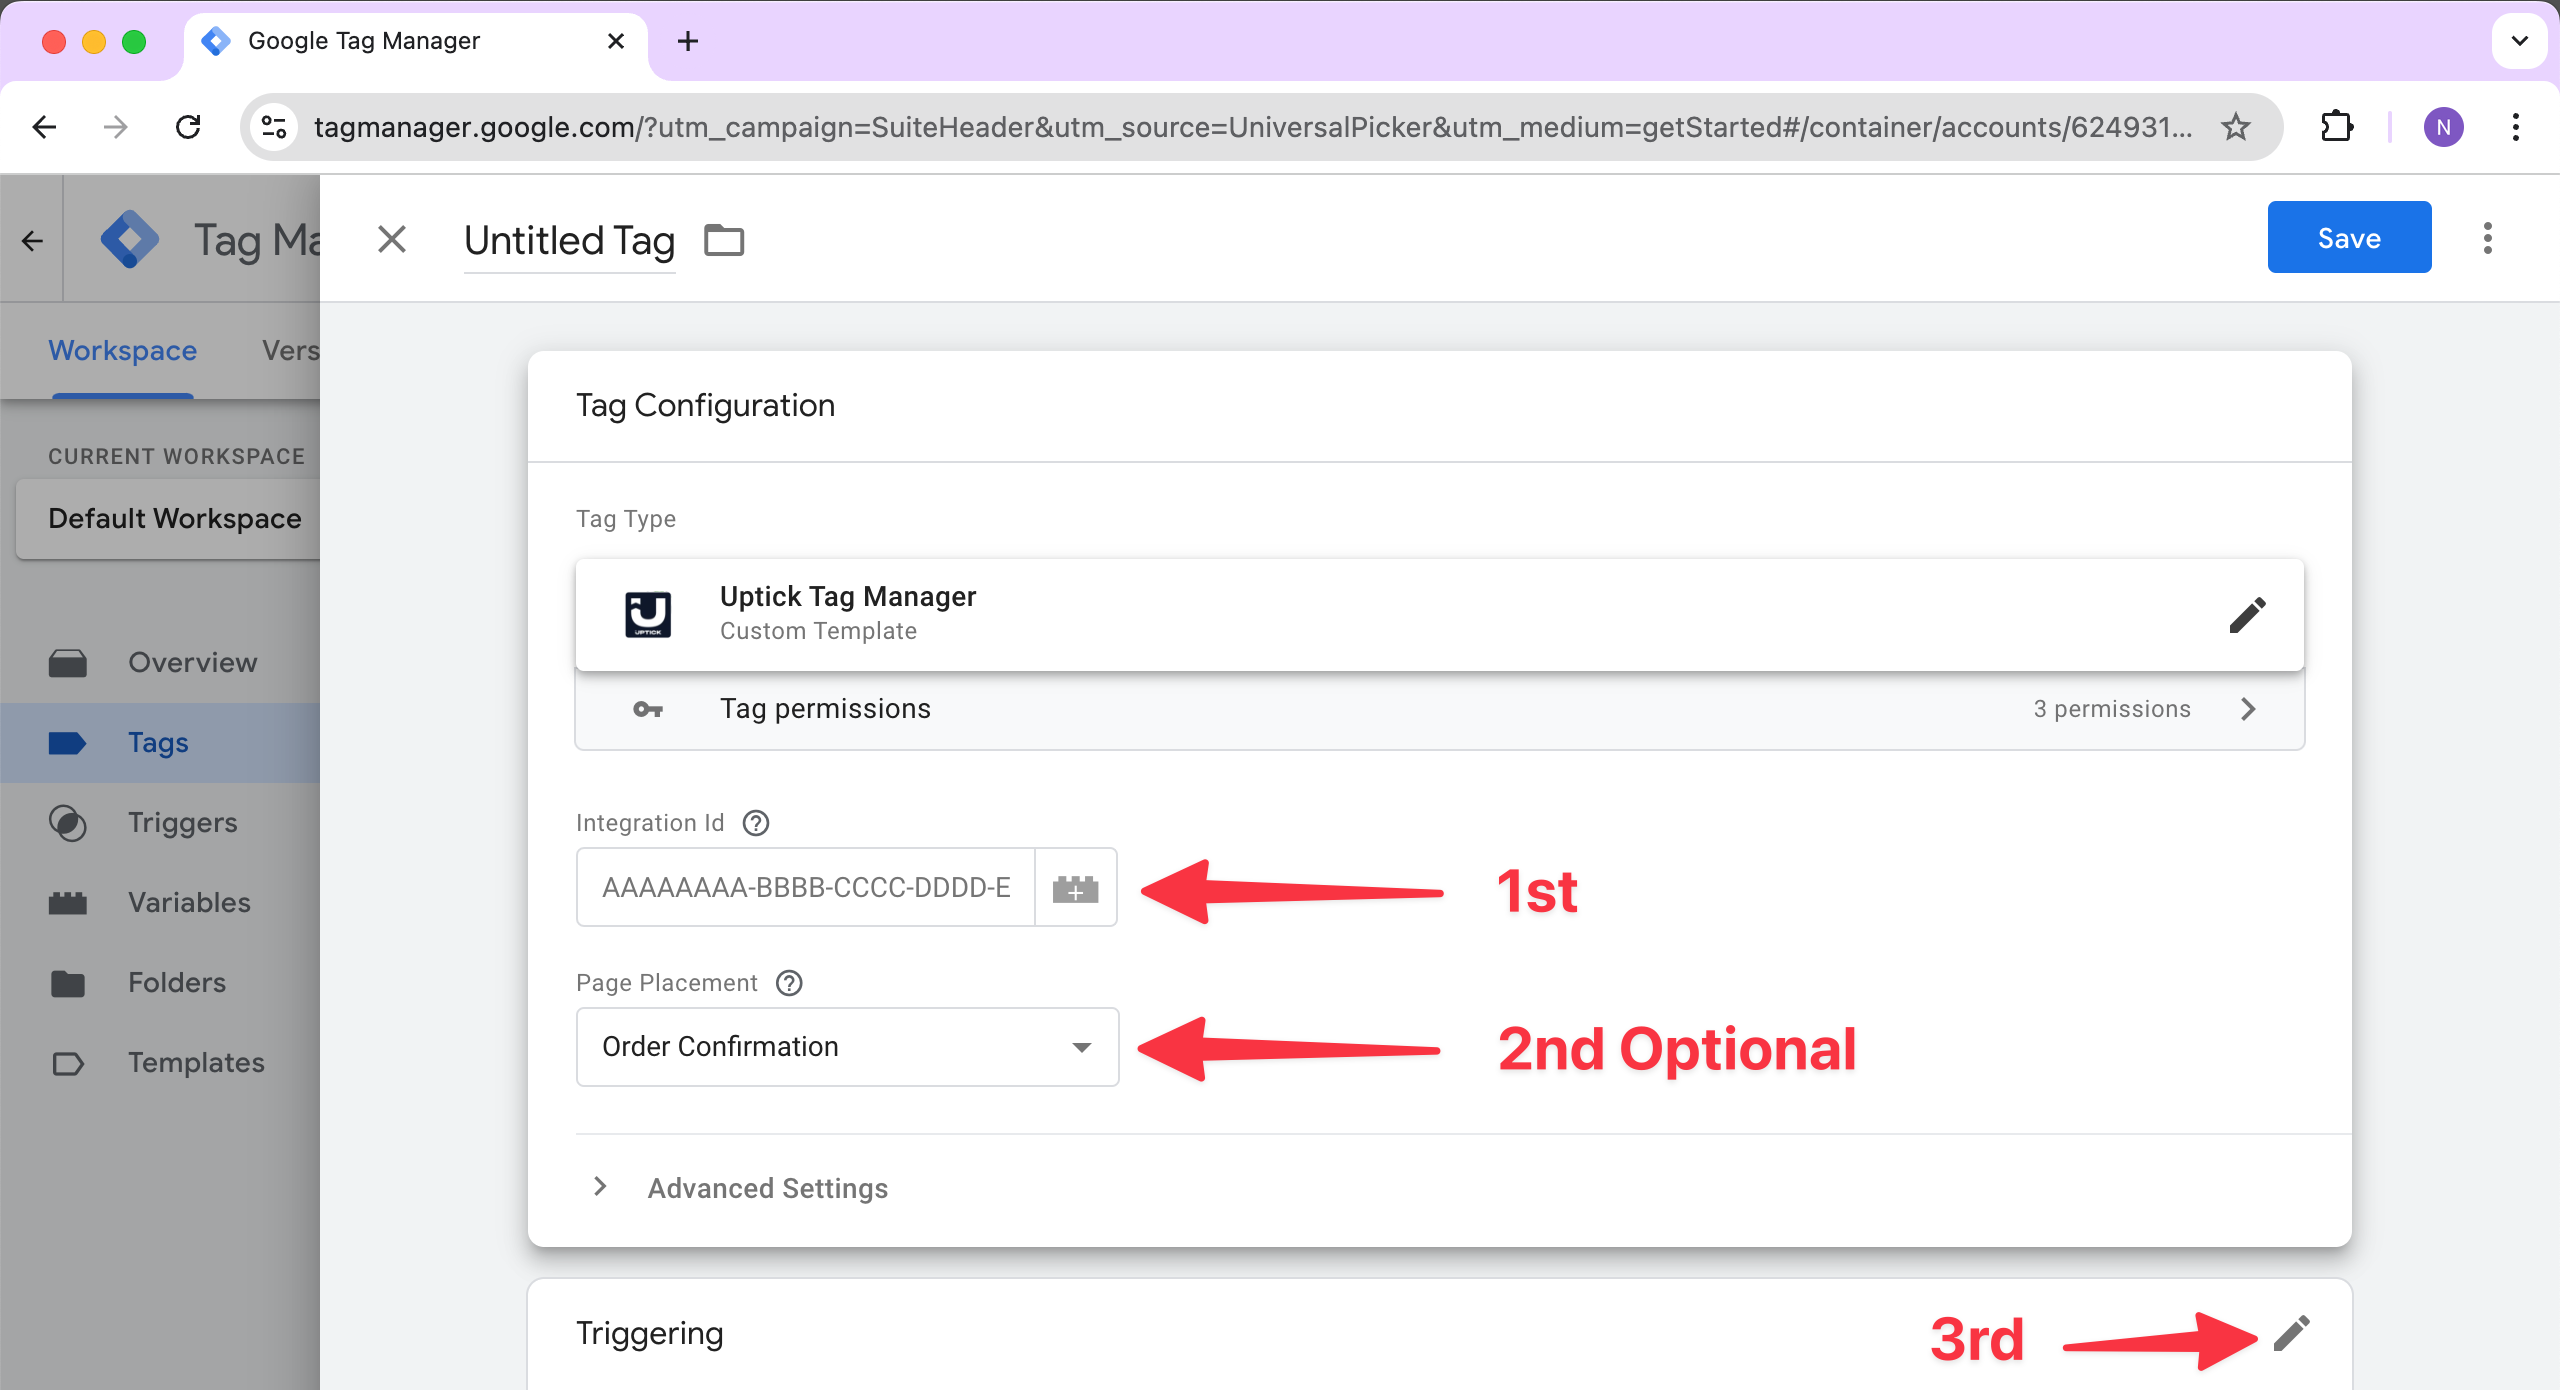
Now that Uptick Tag Manager is added, update the configurations:
- Integration Id: Enter the code provided by your Uptick representative. If you don’t have one, please reach out.
- Placement: Select the page type you intend to show this on. If it is “Order Confirmation”, you can leave this configuration as is.
- Triggering: Hover over the “Triggering” box, and click the edit pencil when it appears.
Inline Rendering (Optional)
By default, offers display as a popup overlay. To render offers inline within a specific element on your page, use the Target Element Selector field.
- Add an element to your page where you want offers to appear, for example:
html <div id="uptick-offers"></div> - In the tag configuration, enter the CSS selector for that element in the Target Element Selector field (e.g.
#uptick-offers). - When configured, offers will render inside the specified element instead of as a popup.
Note: If the target element is not found on the page, a warning will be logged to the console and offers will fall back to the default popup behavior.
Important: Inline rendering must be enabled by the Uptick offers team for your integration. If offers are not appearing inline after configuring the target element, please reach out to your Uptick representative.
Step 12 - Create a new Trigger
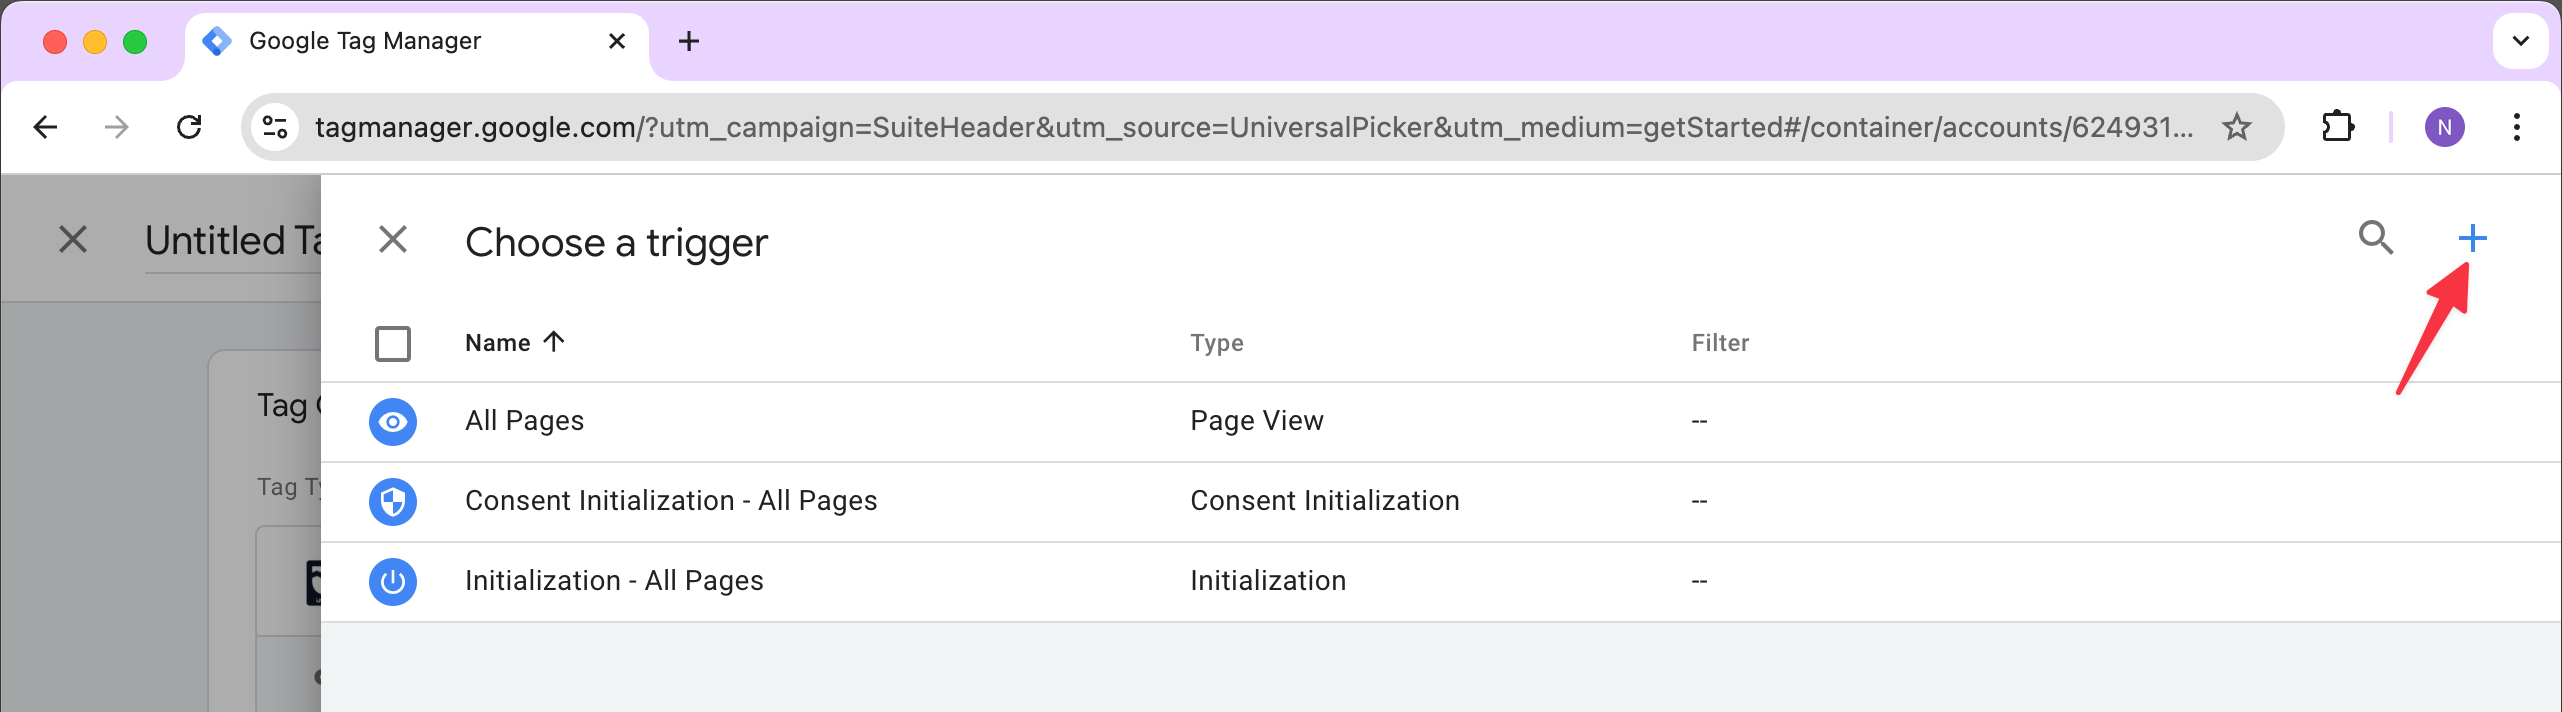
In the Trigger dialog box, click the “+” sign to create a new Trigger.
Step 13 - Configure the Trigger
Hover over “Trigger Configuration” and click the edit pencil to start setting it up.

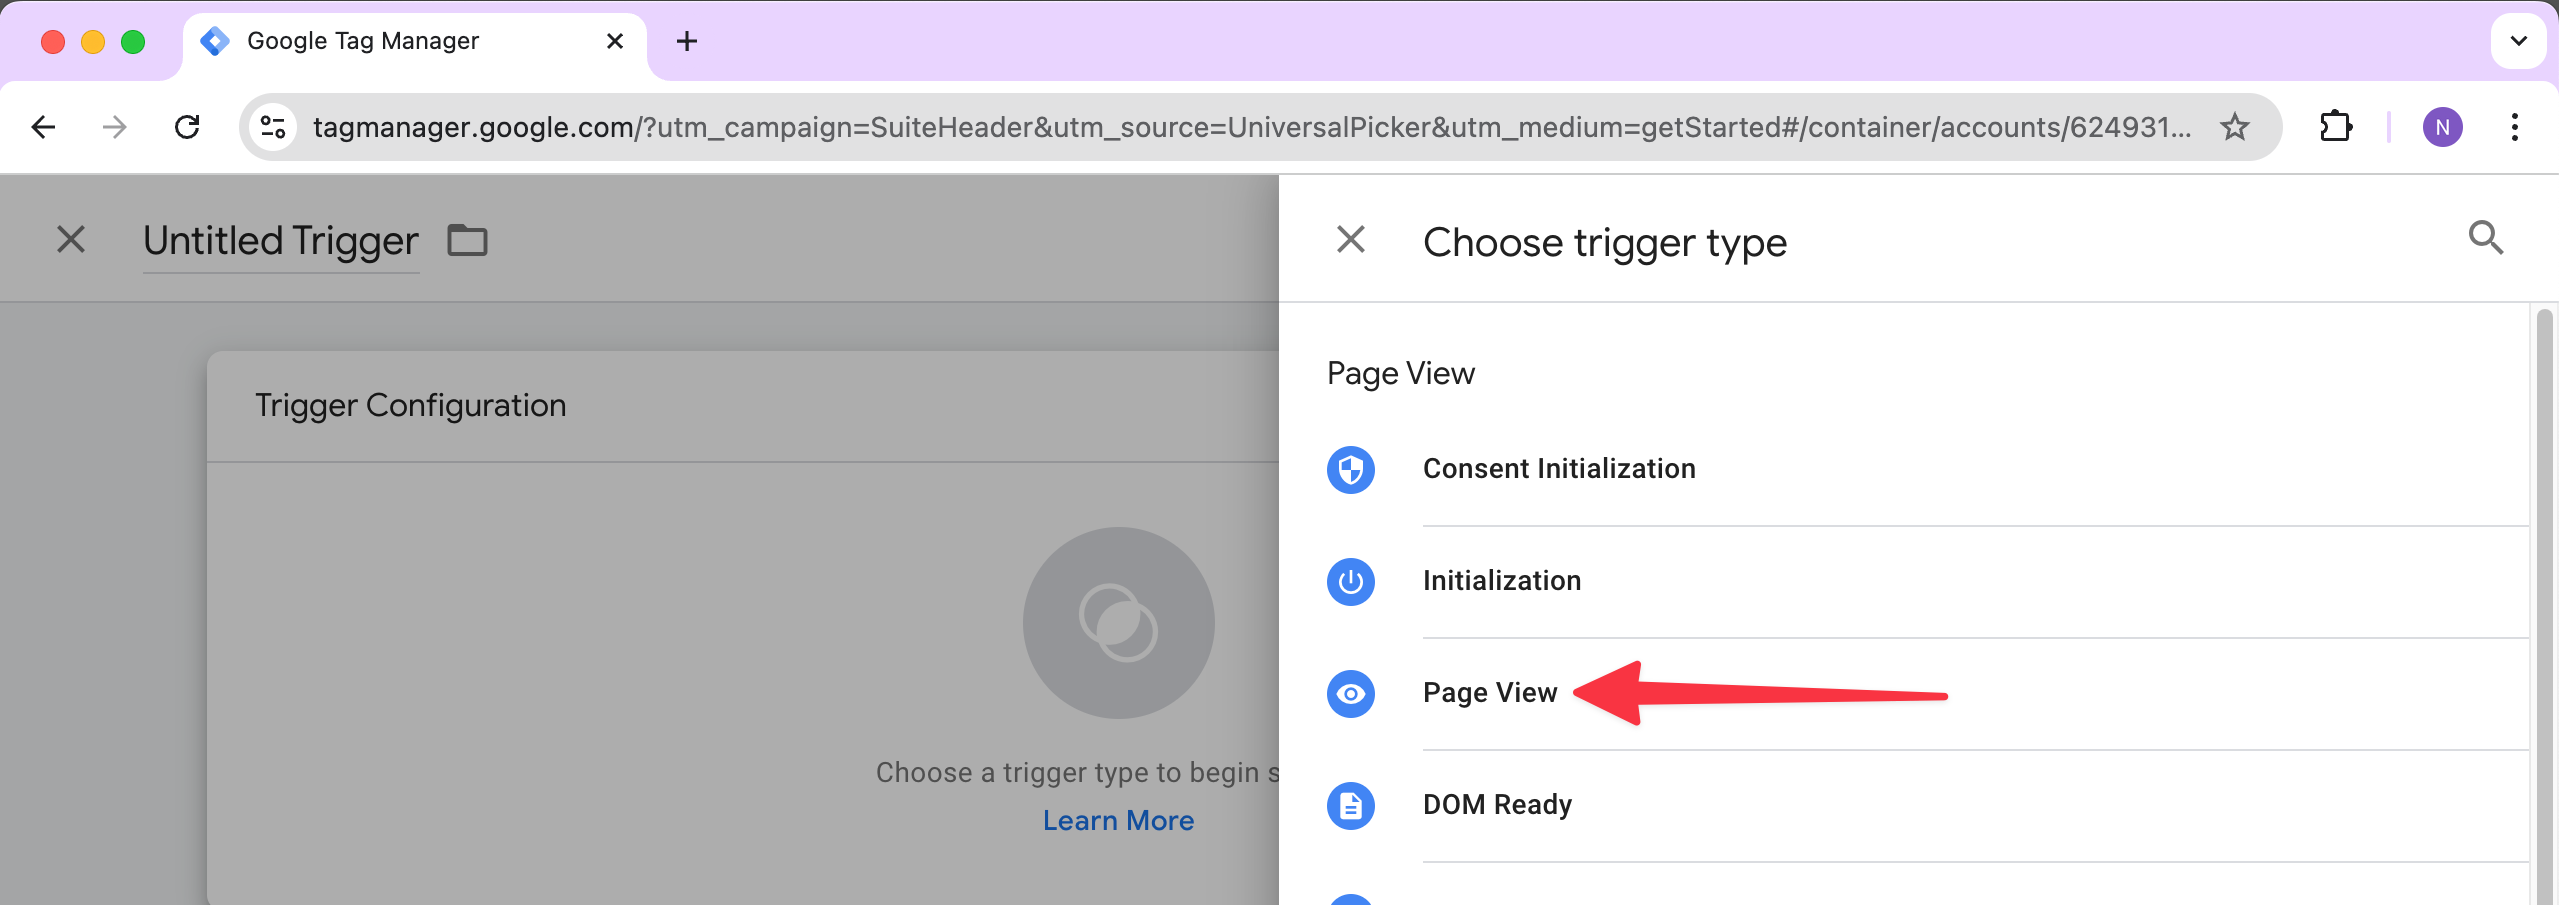
Step 14 - Select the Trigger
Choose “Page View”, which is the simplest trigger type to configure.
Step 15 - Enter the Trigger Settings
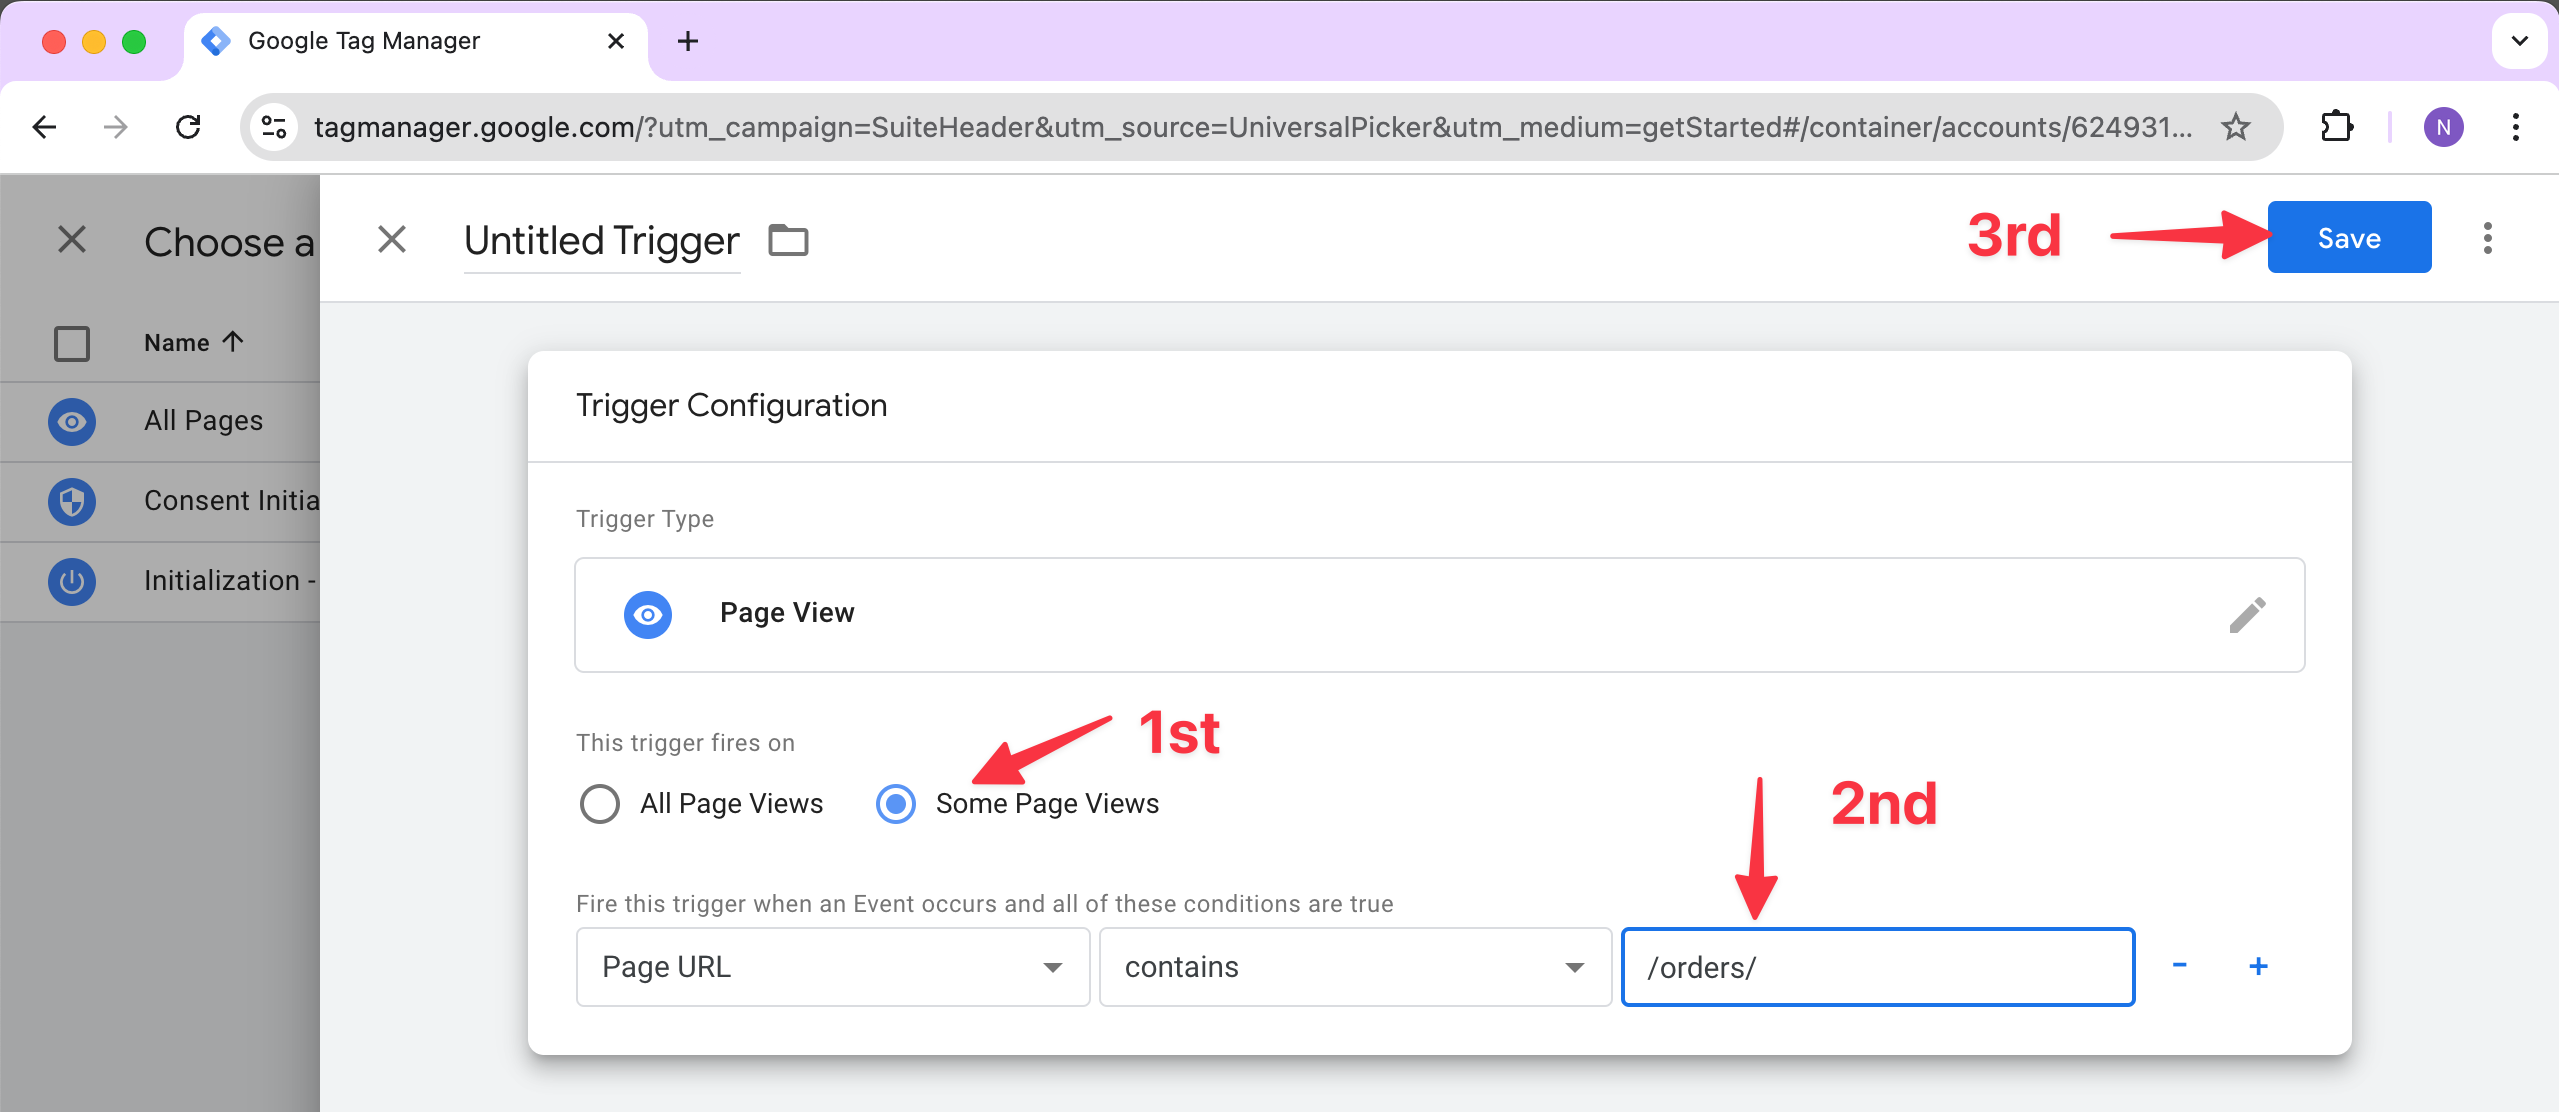
We only want the Uptick integration to trigger on the order confirmation page. Follow these steps:
- Choose “Some Page Views” to trigger the tag only on specific pages.
- Select “Page URL” in the first dropdown. Then select “contains” in the second dropdown. Finally, enter the unique part of your order confirmation page URL (e.g. “/orders/”). As an example we filled in “/orders/” if our checkout page was “https://www.example.com/orders/1342345”. This last input box will be specific to your web page or your platform. If you have an example checkout url and need help, please reach out to your Uptick representative.
- Click “Save” at the top of the page.
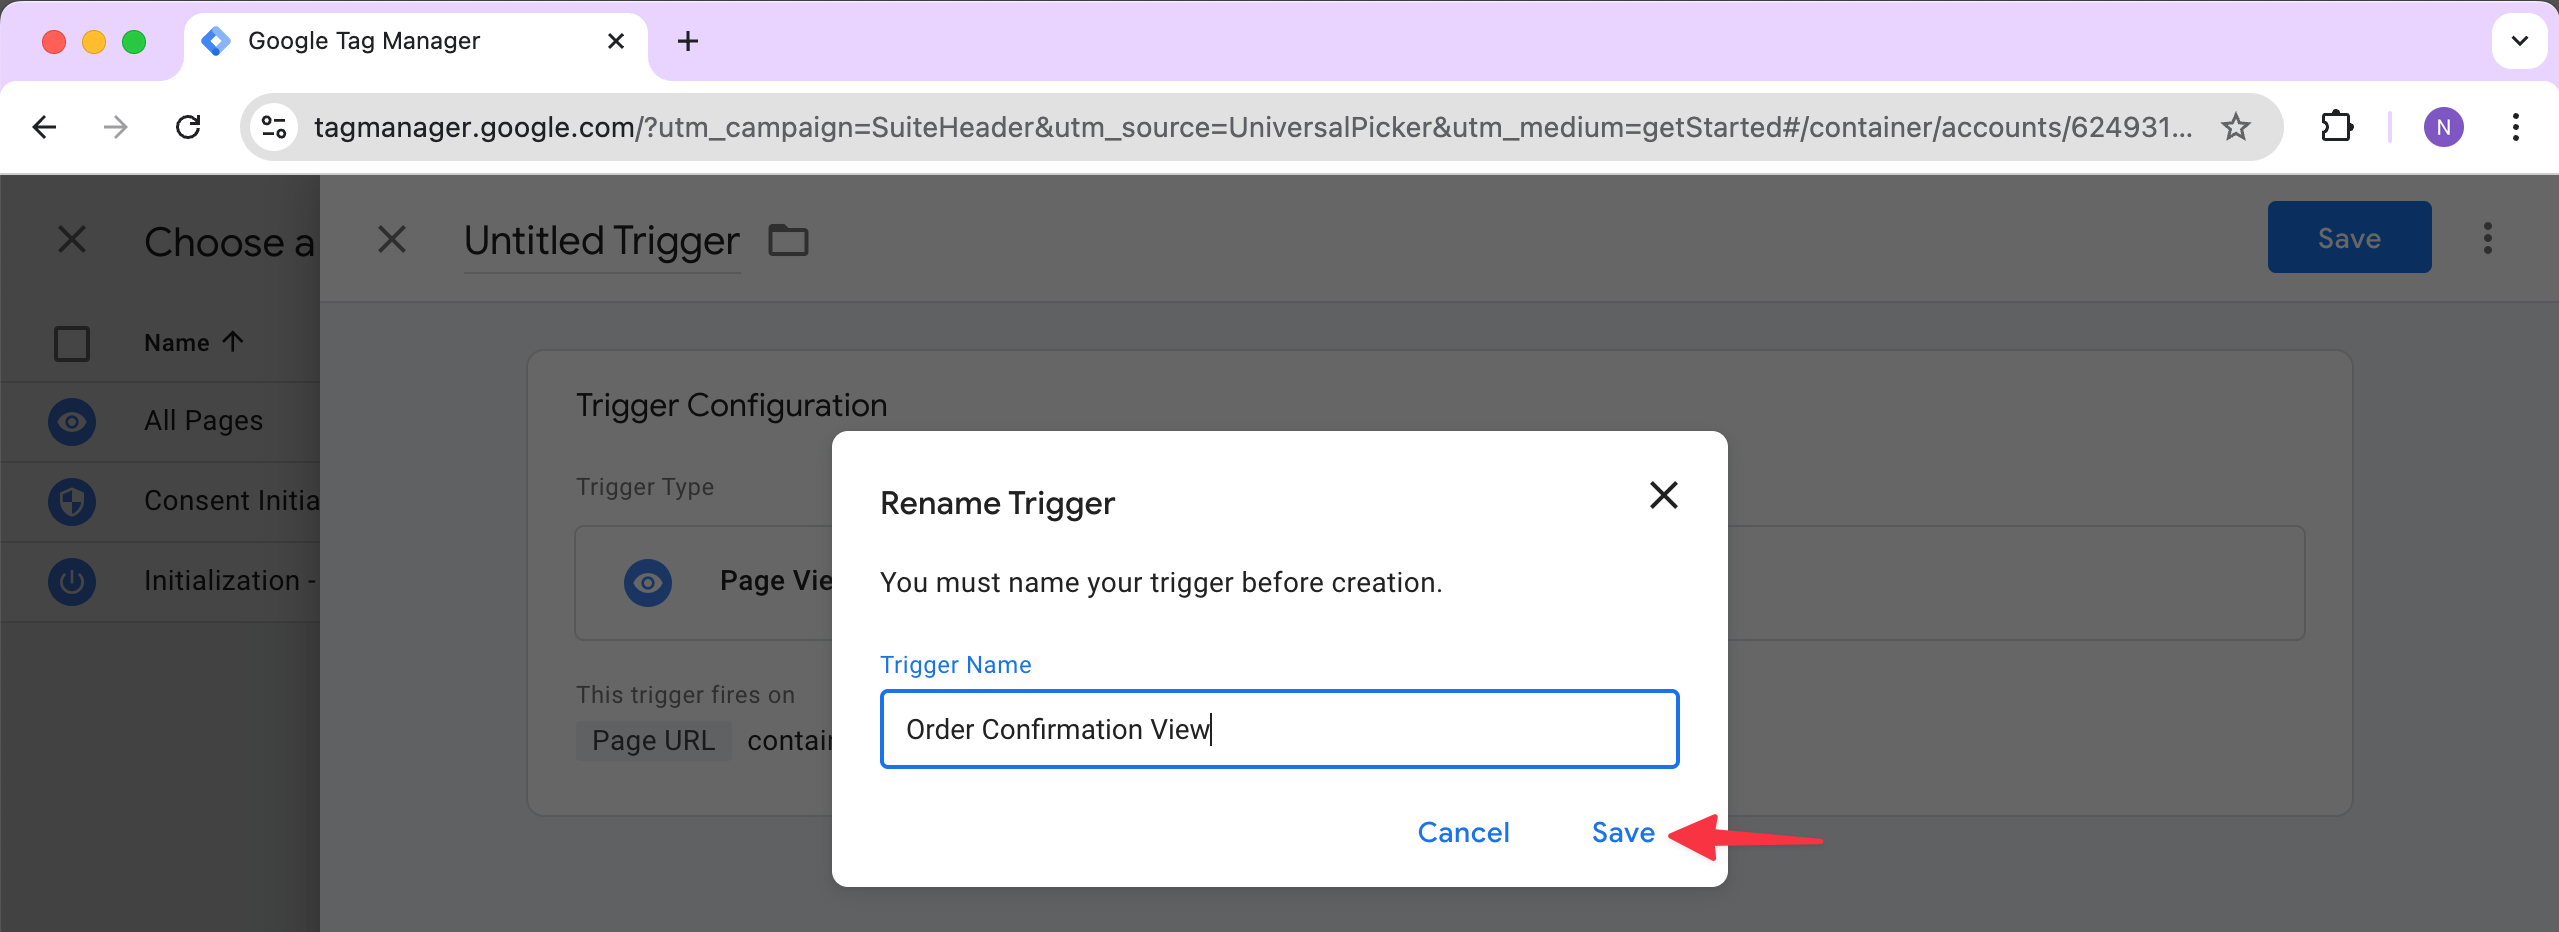
Step 16 - Name the Trigger
Enter a name for easy reference, such as “Order Confirmation View”. Then click “Save” on the dialog box.
Step 17 - Save the Tag
Now that the new tag is set up, click “Save” at the top of the page.
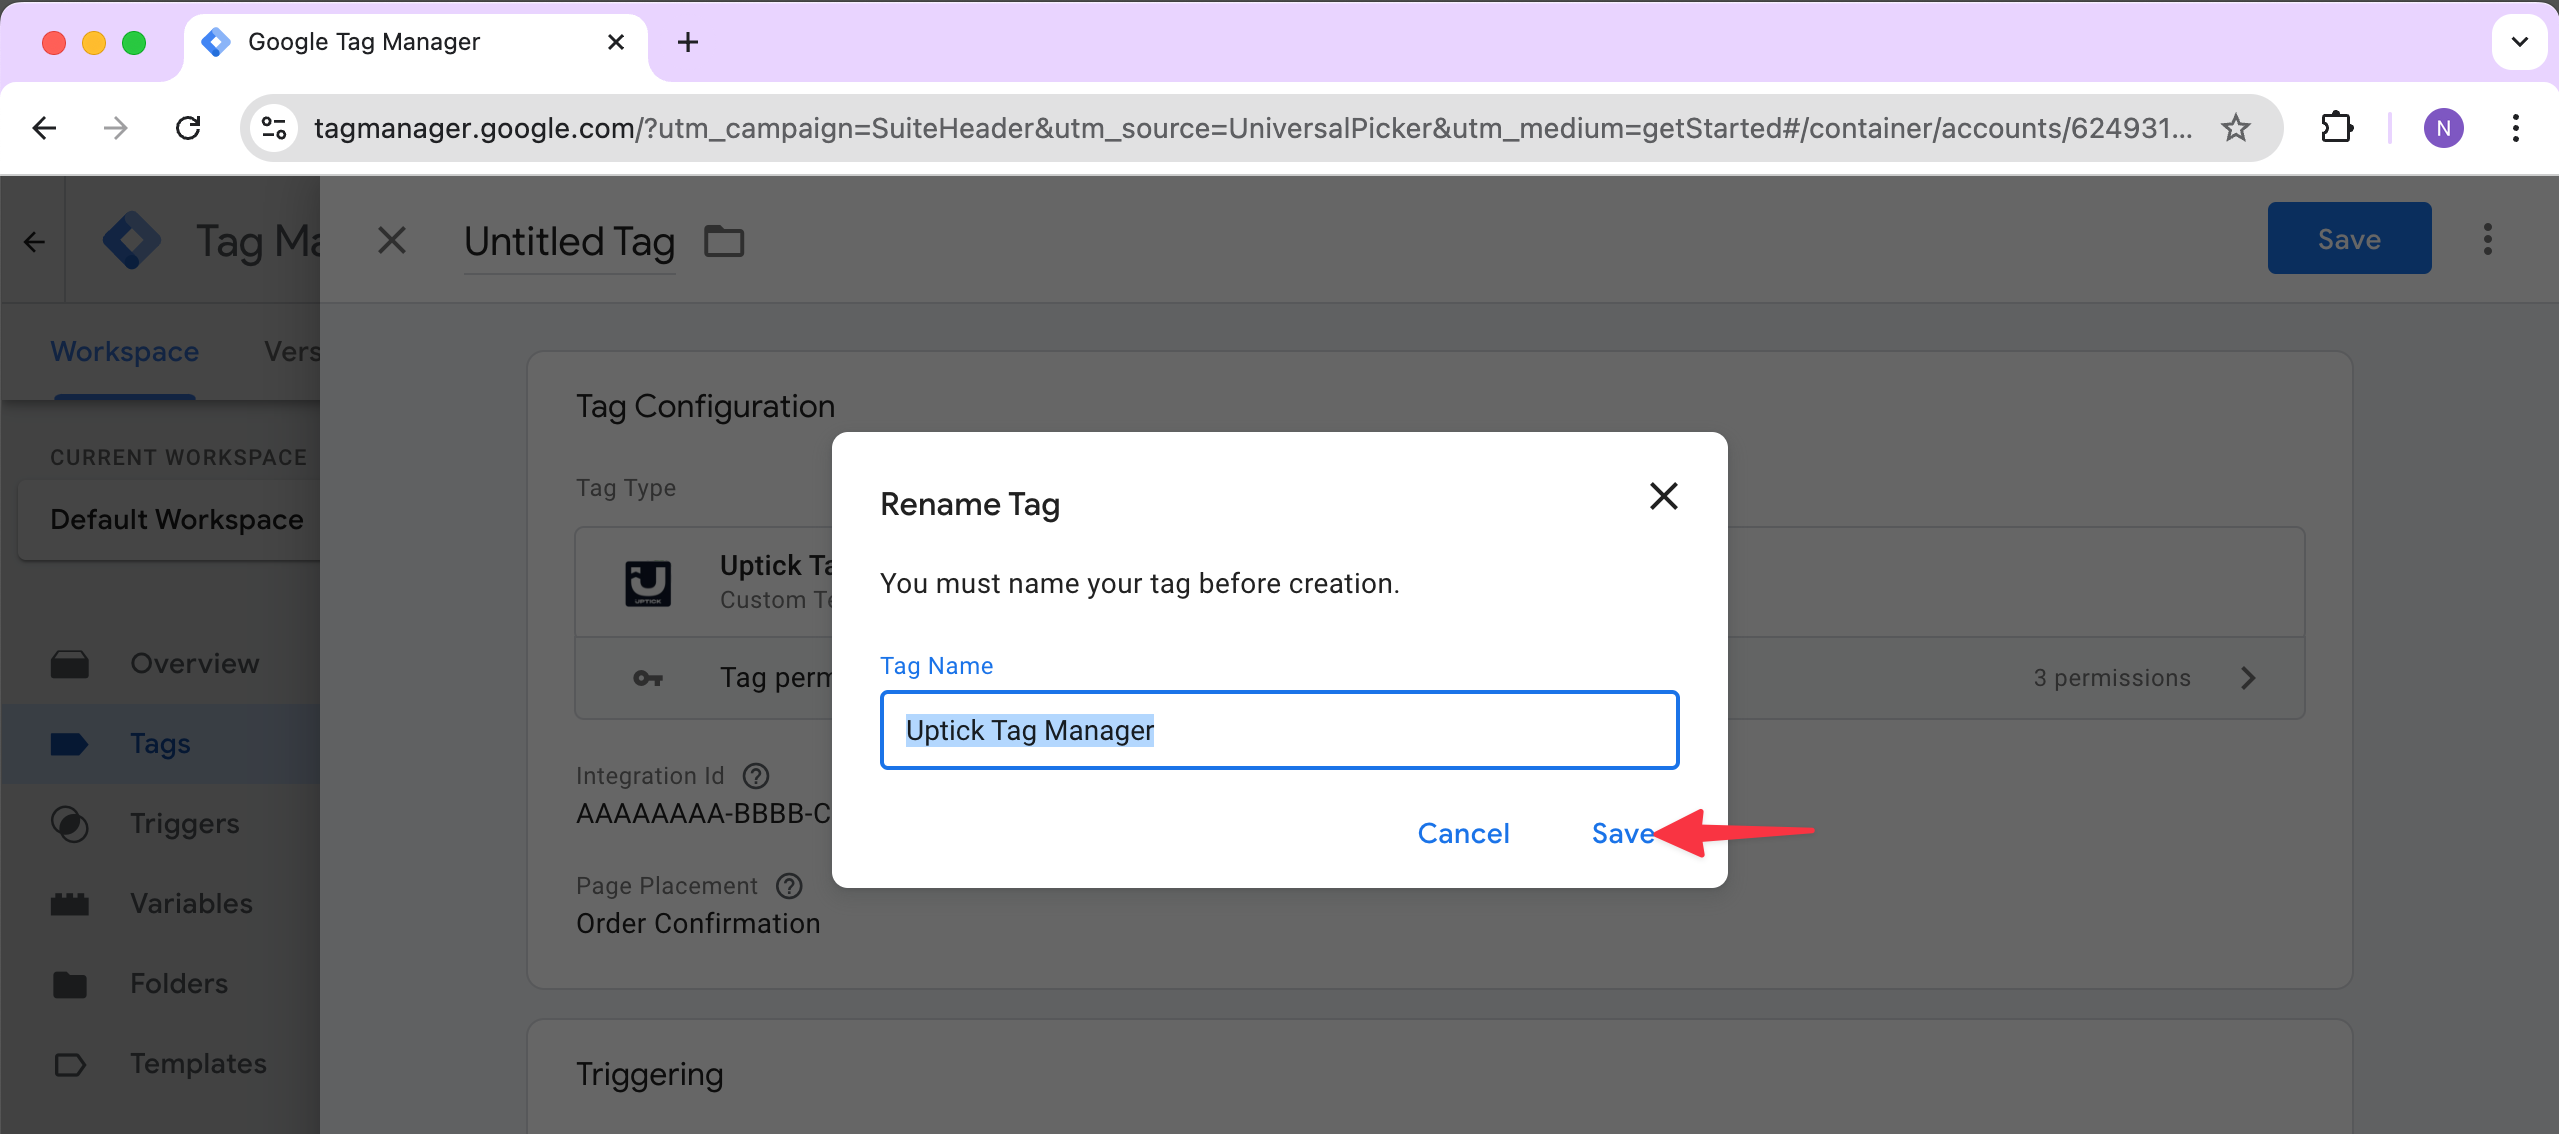
Step 18 - Name the Tag
Give the new Tag a descriptive name, such as “Uptick Tag Manager”.
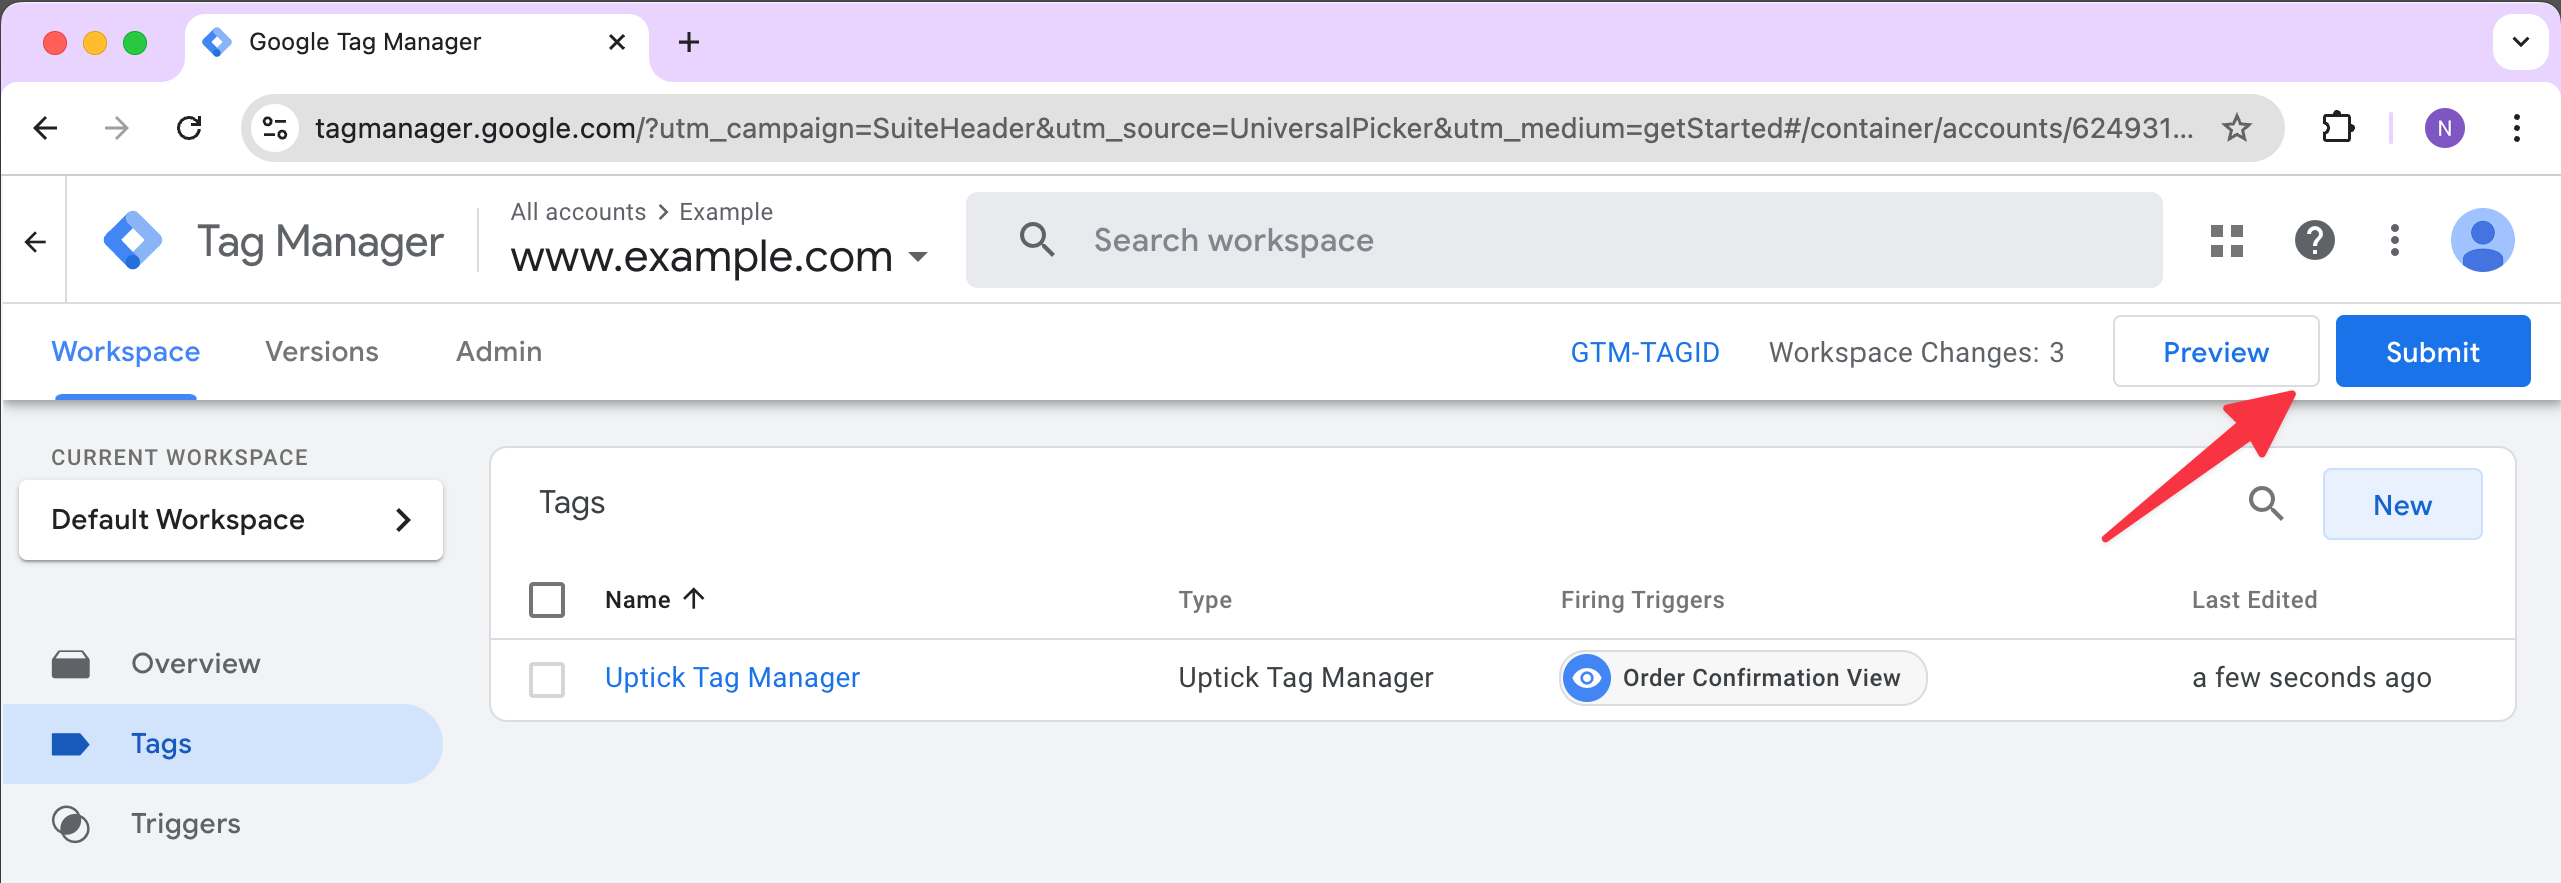
Step 19 - Preview or Save the Tag
To ensure it’s working properly, click “Preview” to test the Tag. Once confirmed, click “Save” and then Deploy your tags. Uptick will start appearing on the order confirmation page.
If Uptick doesn’t show up, double-check the Integration ID and trigger URL settings.
Adding offers to additional pages
The steps above set up a single page (for example, Order Confirmation). To show offers on another page type — such as Order Status — create a separate tag for it:
- Repeat Steps 7–19 to create another tag.
- In Step 11, choose the matching Placement for that page (e.g. “Order Status”).
- In Step 15, configure the trigger for that page’s URL.
Each page you want offers on needs its own tag with its own Placement and trigger.
Passing Customer Parameters (Optional)
Beyond the Integration Id and Placement, you can pass additional parameters such as first_name, total_price, and order_id to improve offer performance through better personalization.
There are two ways to provide them. Most publishers should use Option 1 — it’s built into the tag and requires no extra tags or configuration.
Option 1 — Use the tag’s Personalization fields (recommended)
The Uptick Tag Manager tag includes an optional Personalization section with a field for each supported parameter. Because the tag sets these values before it loads the Uptick script, no separate tag or tag sequencing is needed.
These fields read their values from your site’s GTM dataLayer by way of Data Layer Variables. The steps below set up the first parameter (First Name) end to end; you then repeat the same pattern for each value you want to send.
This guide assumes your page pushes the relevant values into the dataLayer before GTM loads, for example:
<script>
  window.dataLayer = window.dataLayer || [];
  window.dataLayer.push({
    customer: { first_name: "Reggie" },
    order: { id: "12345", total_price: "$49.99", shipping_price: "$9.99" }
  });
</script>
Use whatever keys your dataLayer actually uses — you’ll point each Data Layer Variable at the matching key path.
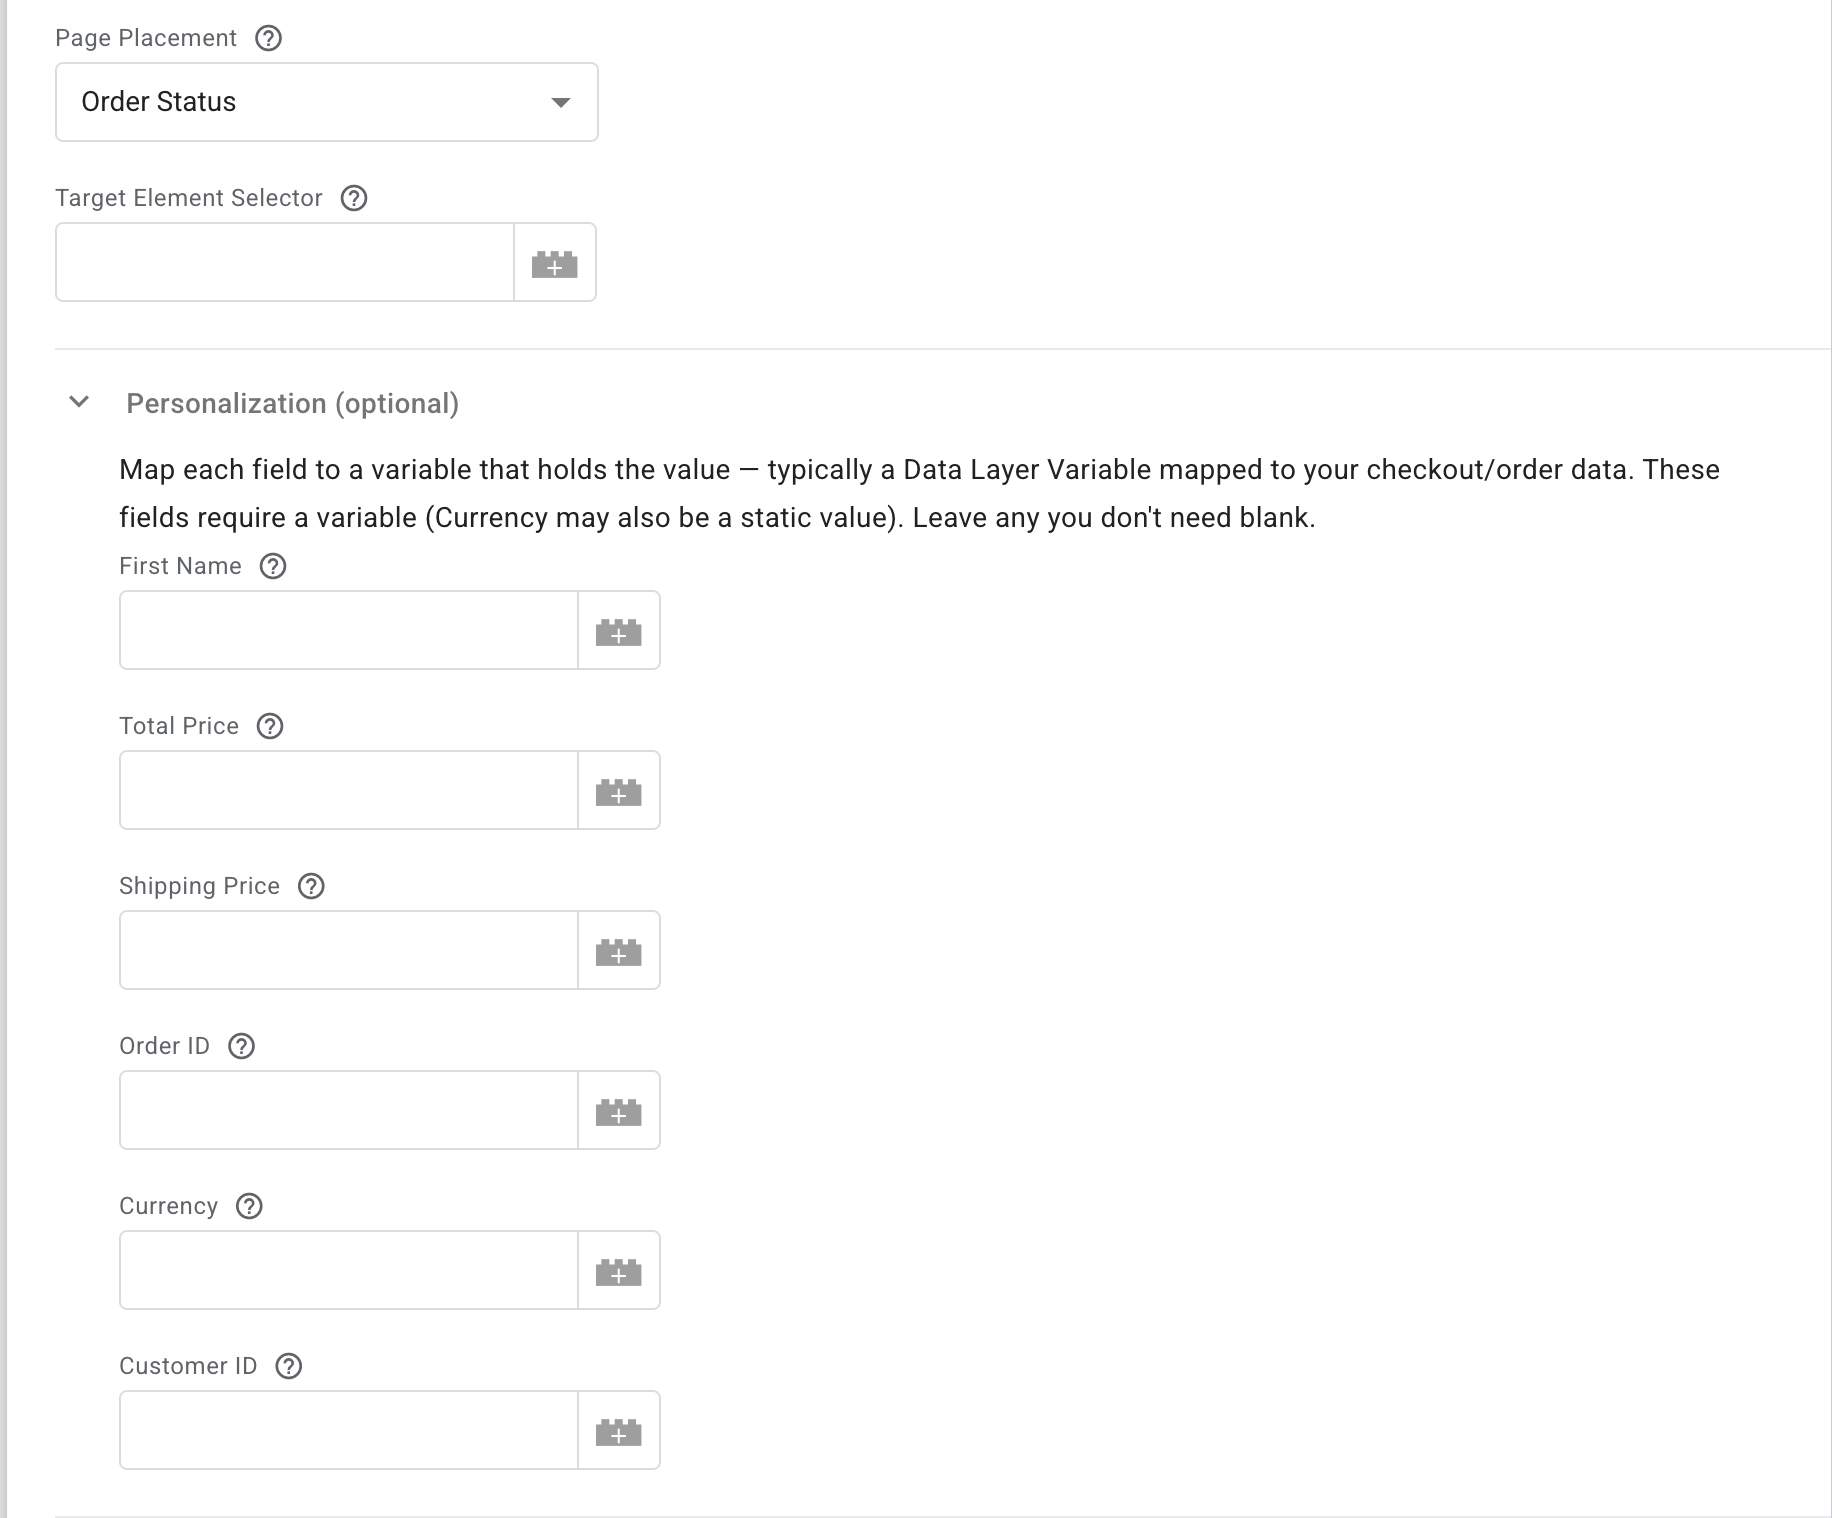
Step 20 - Open the Personalization section
Open your Uptick Tag Manager tag, and in the tag configuration expand the Personalization (optional) section. You’ll see a field for each supported parameter.
Step 21 - Create a Data Layer Variable for the first parameter
We’ll start with First Name.
a. Open the variable picker — click the variable icon (the building-block icon) to the right of the First Name field.
![]()
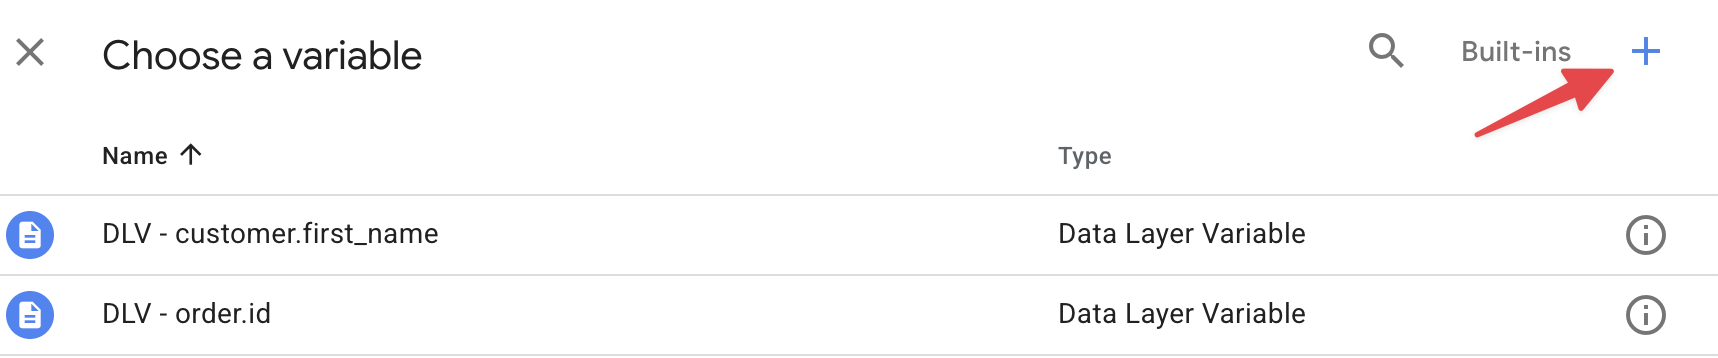
b. Add a new variable — in the “Choose a variable” picker, click “+” in the top right.
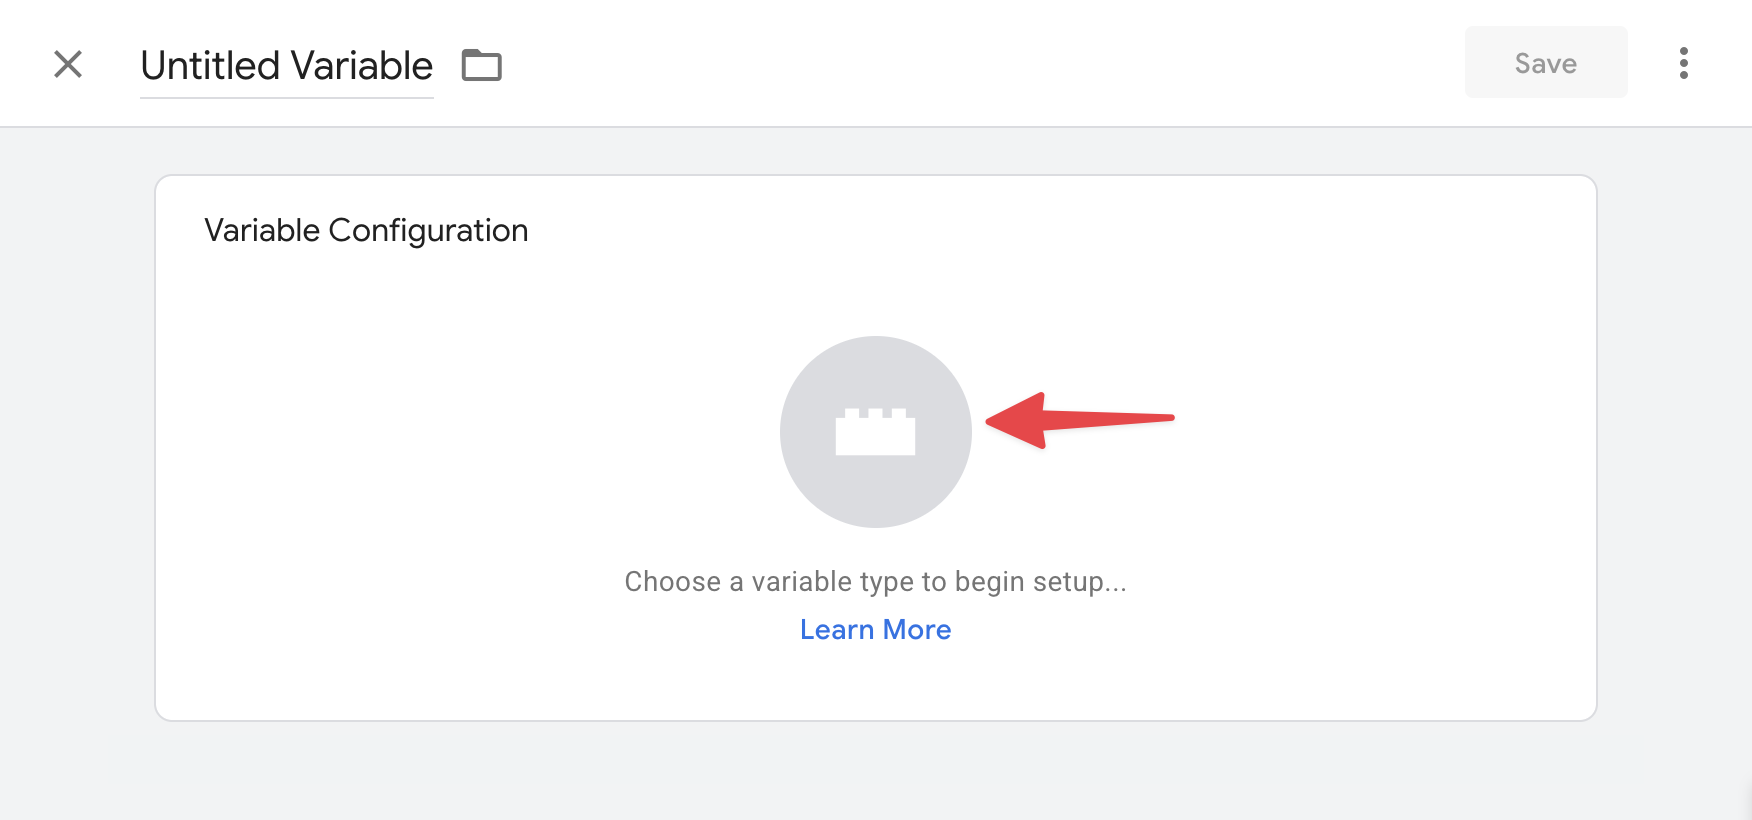
c. Open the variable type chooser — in the new (Untitled) variable, click to choose a variable type.
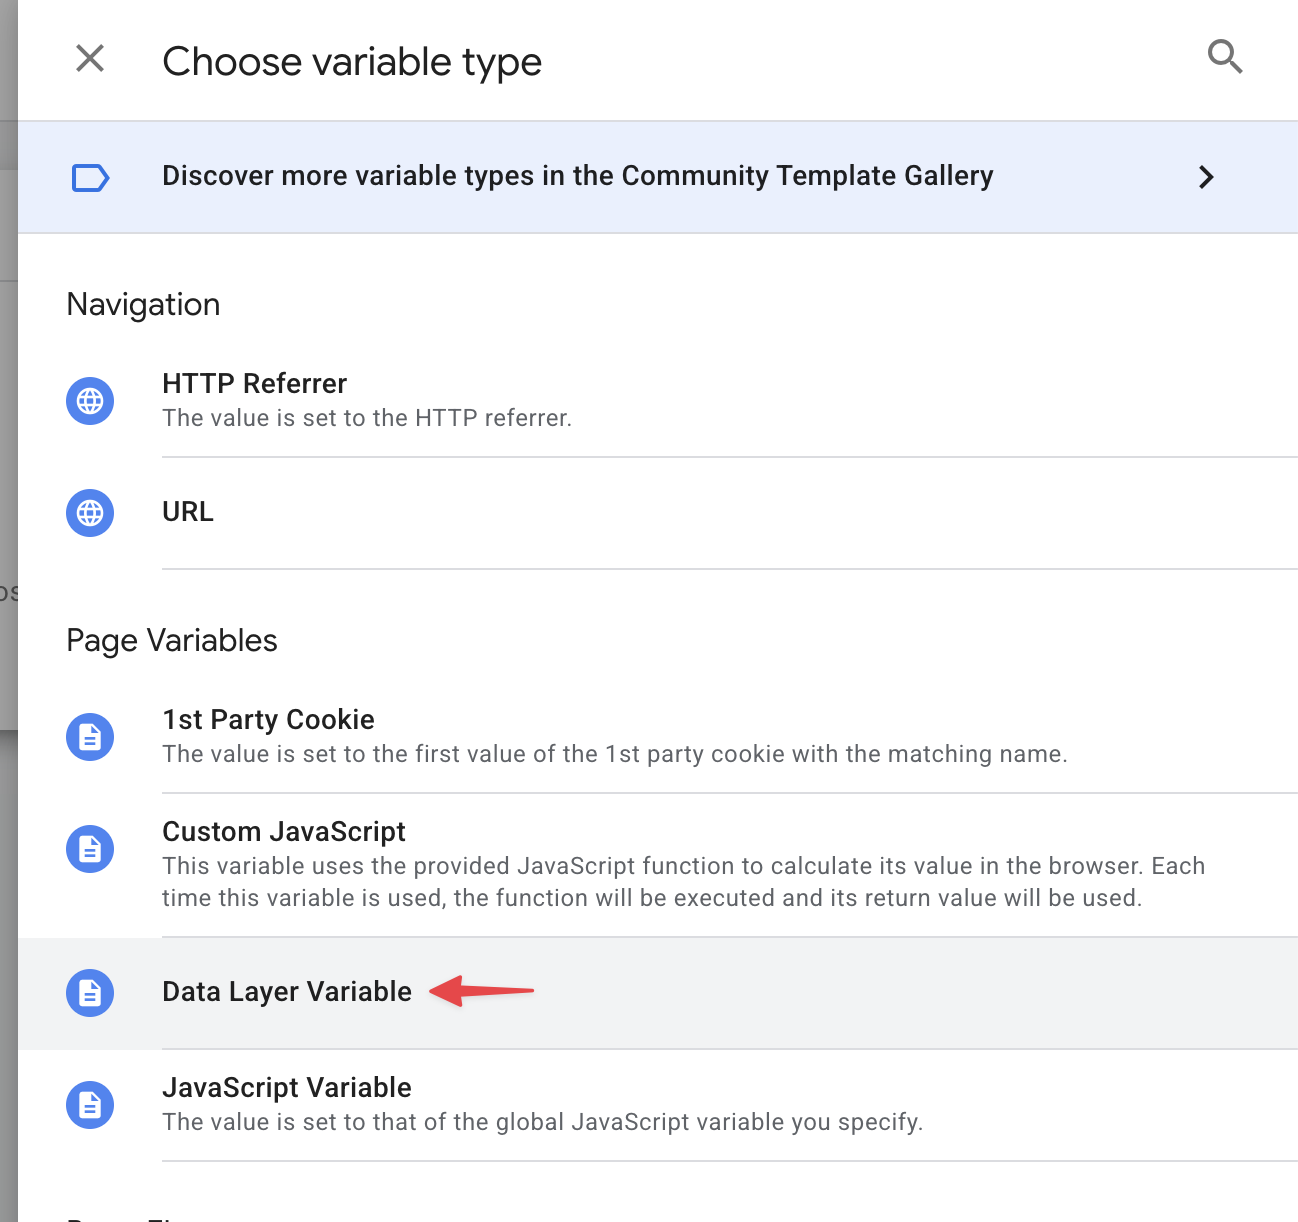
d. Select Data Layer Variable from the list of types.
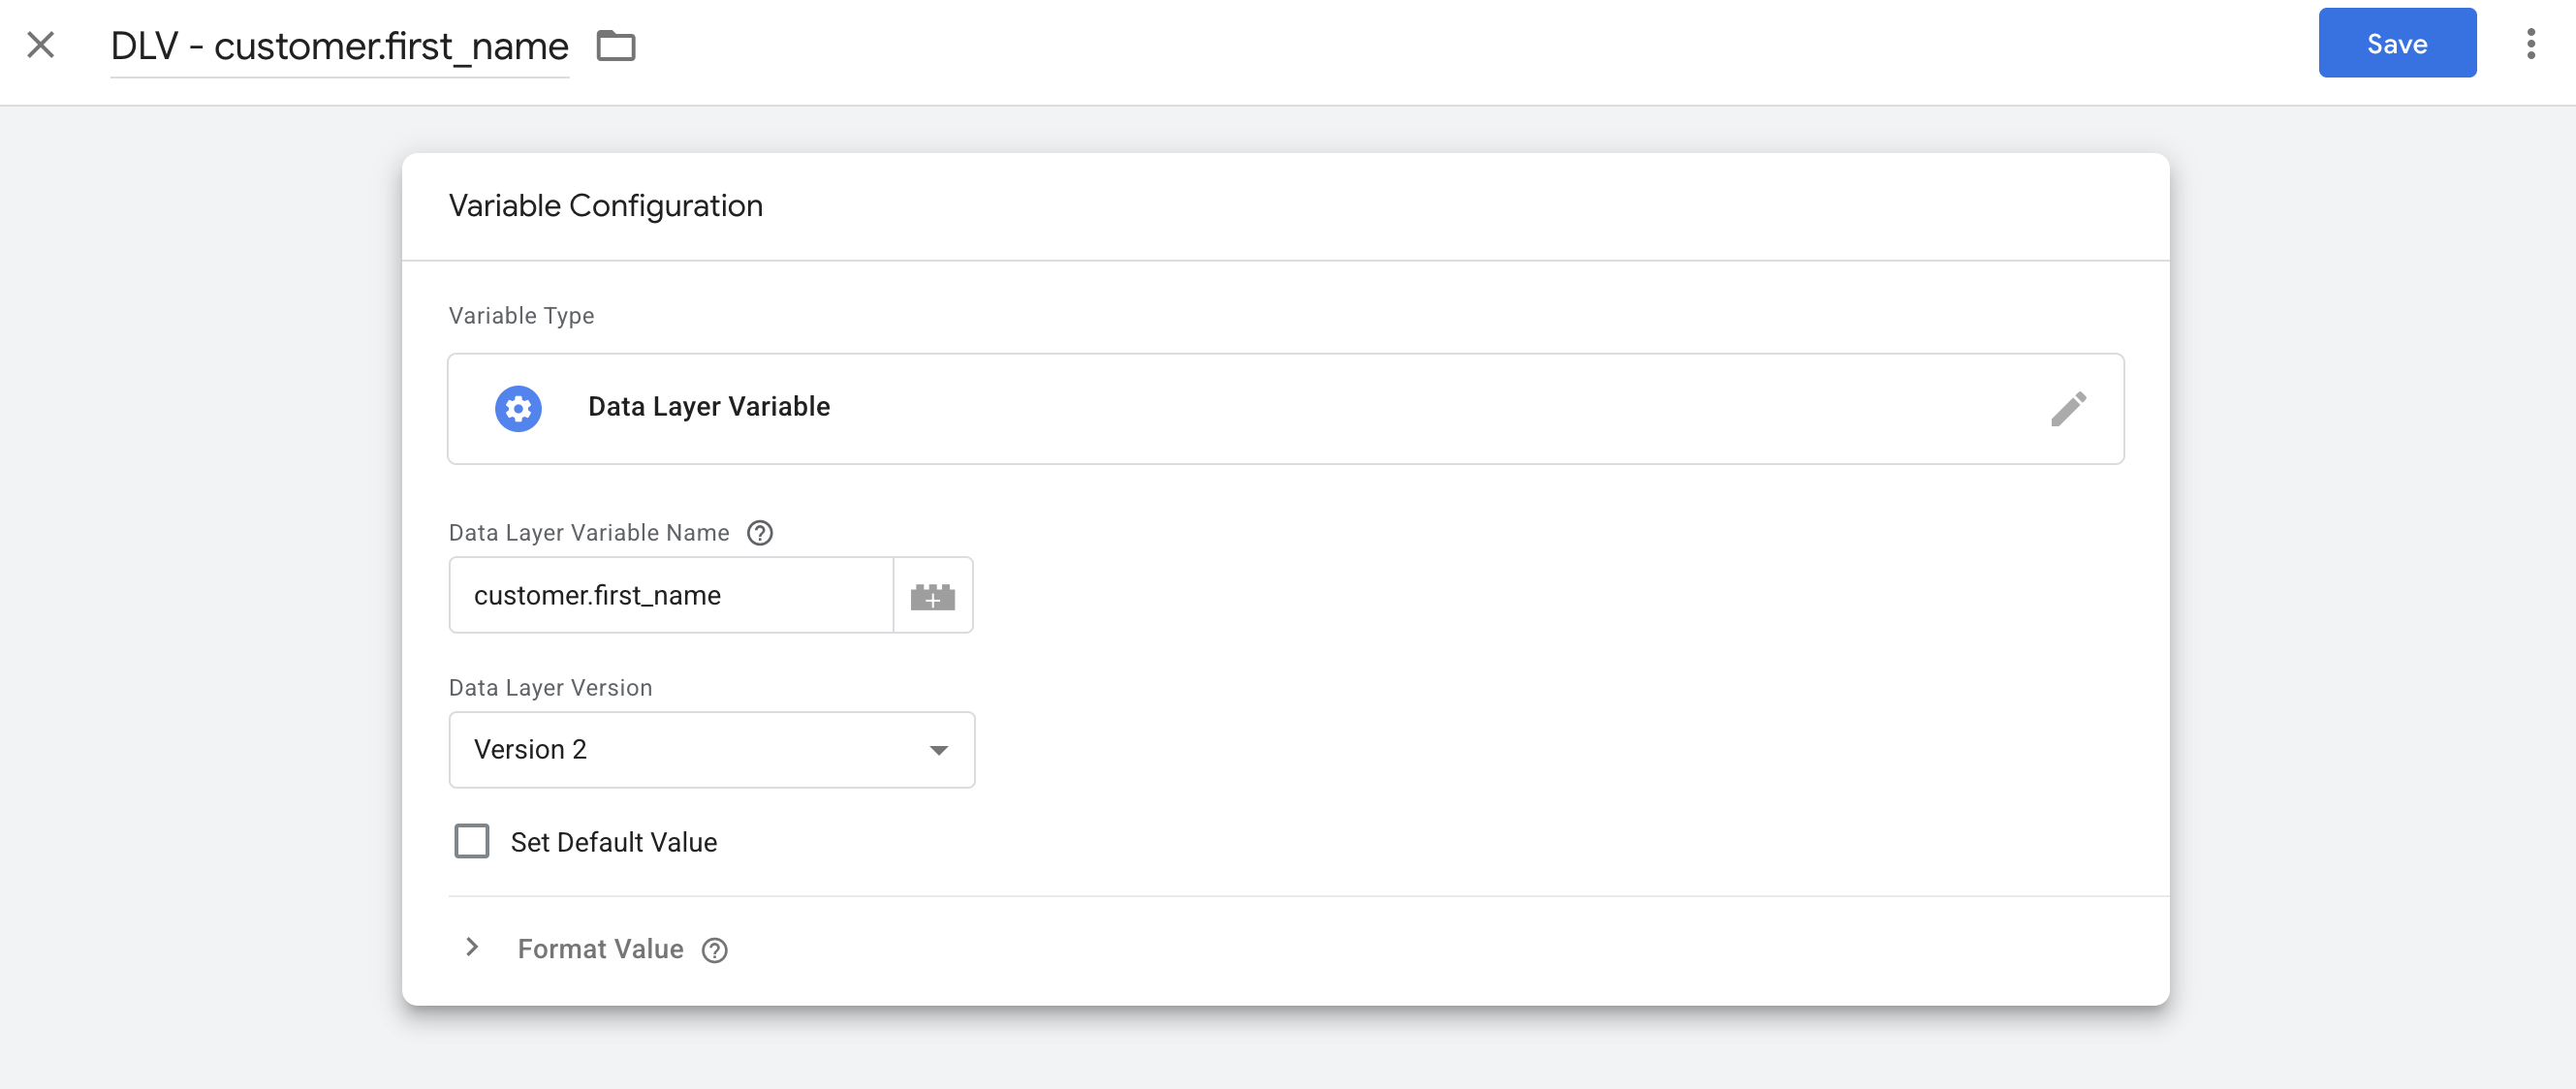
e. Configure and save — set the Data Layer Variable Name to the key your page pushes (for First Name that’s customer.first_name), keep Data Layer Version on Version 2 so nested keys resolve, and leave Set Default Value unchecked so a missing value is simply ignored. Give it a clear name like DLV - customer.first_name and click Save.
Step 22 - Confirm the field is mapped
After saving, the First Name field shows your variable reference, e.g. {{DLV - customer.first_name}}. That’s it for this parameter.
Step 23 - Repeat for each parameter
Repeat Steps 21–22 for every other value you want to send, pointing each Data Layer Variable at the matching key in your dataLayer. For the example dataLayer above:
| Field | Data Layer Variable Name |
|---|---|
| First Name | customer.first_name |
| Total Price | order.total_price |
| Shipping Price | order.shipping_price |
| Order ID | order.id |
| Currency | order.currency |
| Customer ID | (only if your dataLayer includes one) |
These fields require a variable so the value stays dynamic per page. Currency is the one exception — it may be a static value such as USD if your store uses a single currency. Leave any field you don’t need blank; empty fields are ignored.
Step 24 - Save, Preview, and Deploy
Click Save on the tag, then Preview. On an order page, open the browser’s Network tab and confirm the offers request now includes the parameters you mapped (e.g. first_name, total_price). Once confirmed, Deploy your changes.
Option 2 — Set the parameters directly on the page
If you’d rather not use the dataLayer (or aren’t using the tag’s fields), set a global window.uptickParams object directly on the page. The Uptick script reads any supported parameters from it automatically. Place this script before the Google Tag Manager snippet so the values are ready when the Uptick tag fires.
<script>
  window.uptickParams = window.uptickParams || {};
  Object.assign(window.uptickParams, {
    first_name: "Reggie",
    total_price: "$49.99",
    shipping_price: "$9.99",
    order_id: "12345"
  });
</script>
Replace the example values with your platform’s dynamic values (e.g. template variables for the logged-in customer and current order).