Dashboard API
Overview
Uptick partners can download Dashboard data in a JSON format. This guide provides a step-by-step overview of how to access and retrieve data through the Uptick Dashboard API.
Note: The data and metrics available through the API are specific to your partner account and permissions.
Step 1: Generate Your Authentication Token
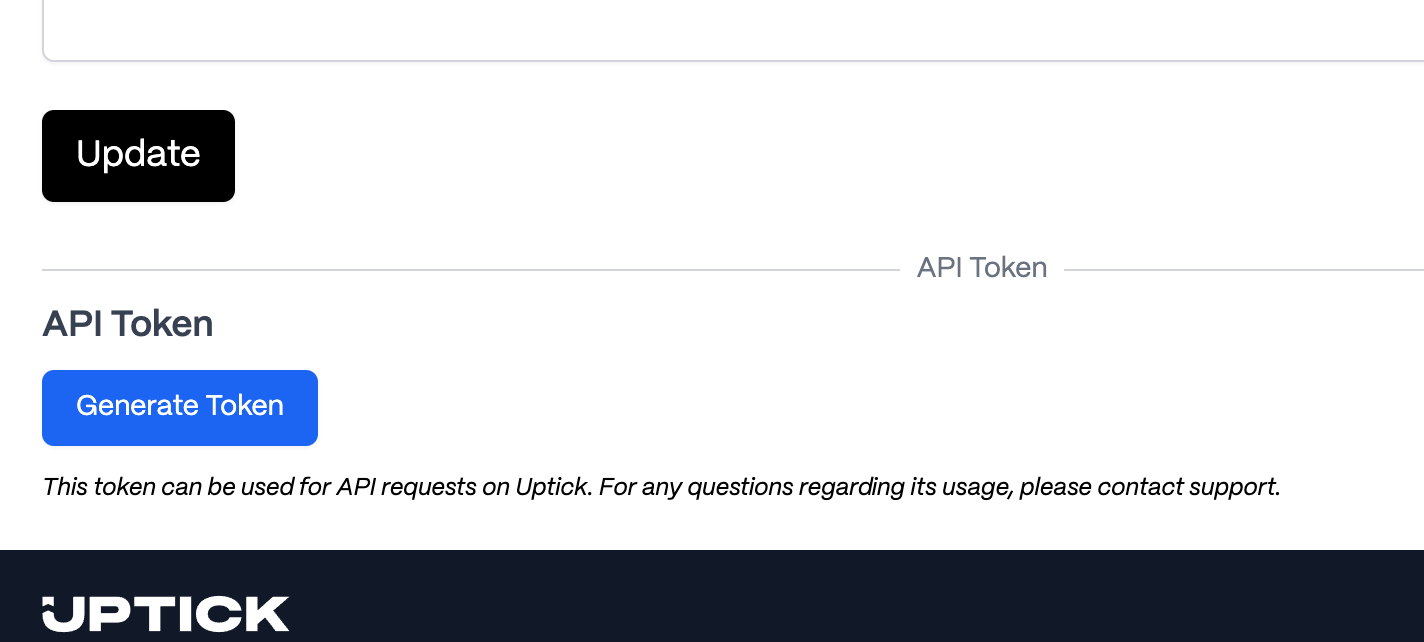
The first step is to generate an Authentication Token. To do this:
- Visit your user profile page: https://dashboard.uptick.com/user/edit .
- Scroll to the bottom of the page and locate the API Token section.
- Click Generate Token.
Step 2: Copy and Secure Your Authentication Token
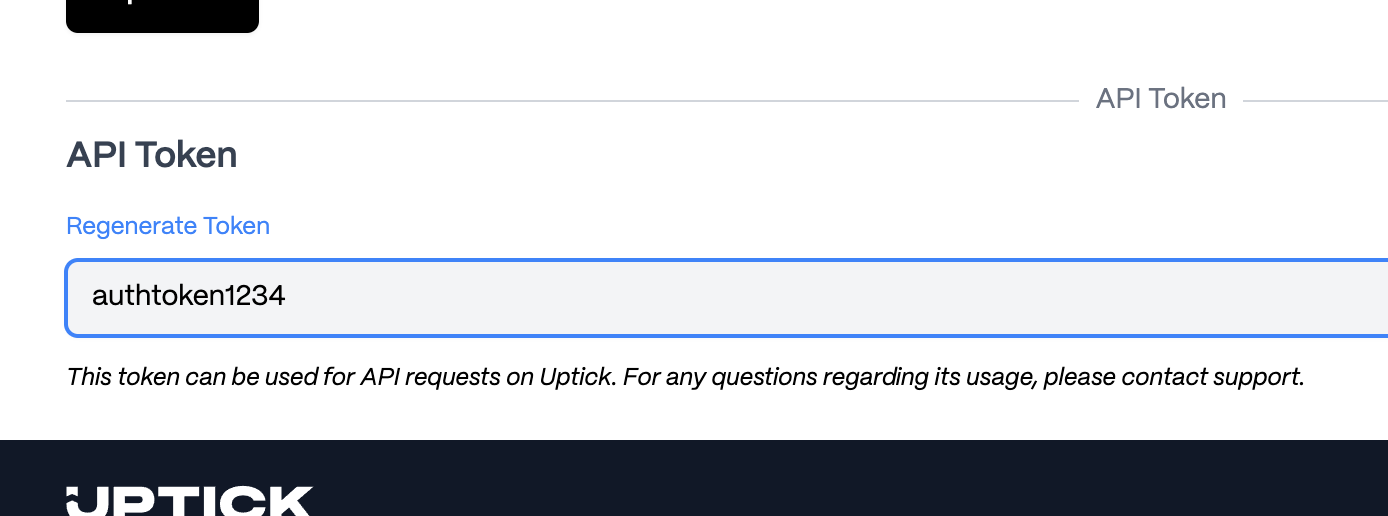
Once your Authentication Token is generated:
- Copy the token displayed on the page.
- Save it in a secure location for use in API requests.
If needed, you can regenerate the token later by returning to your profile page and selecting Regenerate Token.
Step 3: Configure Your Dashboard View
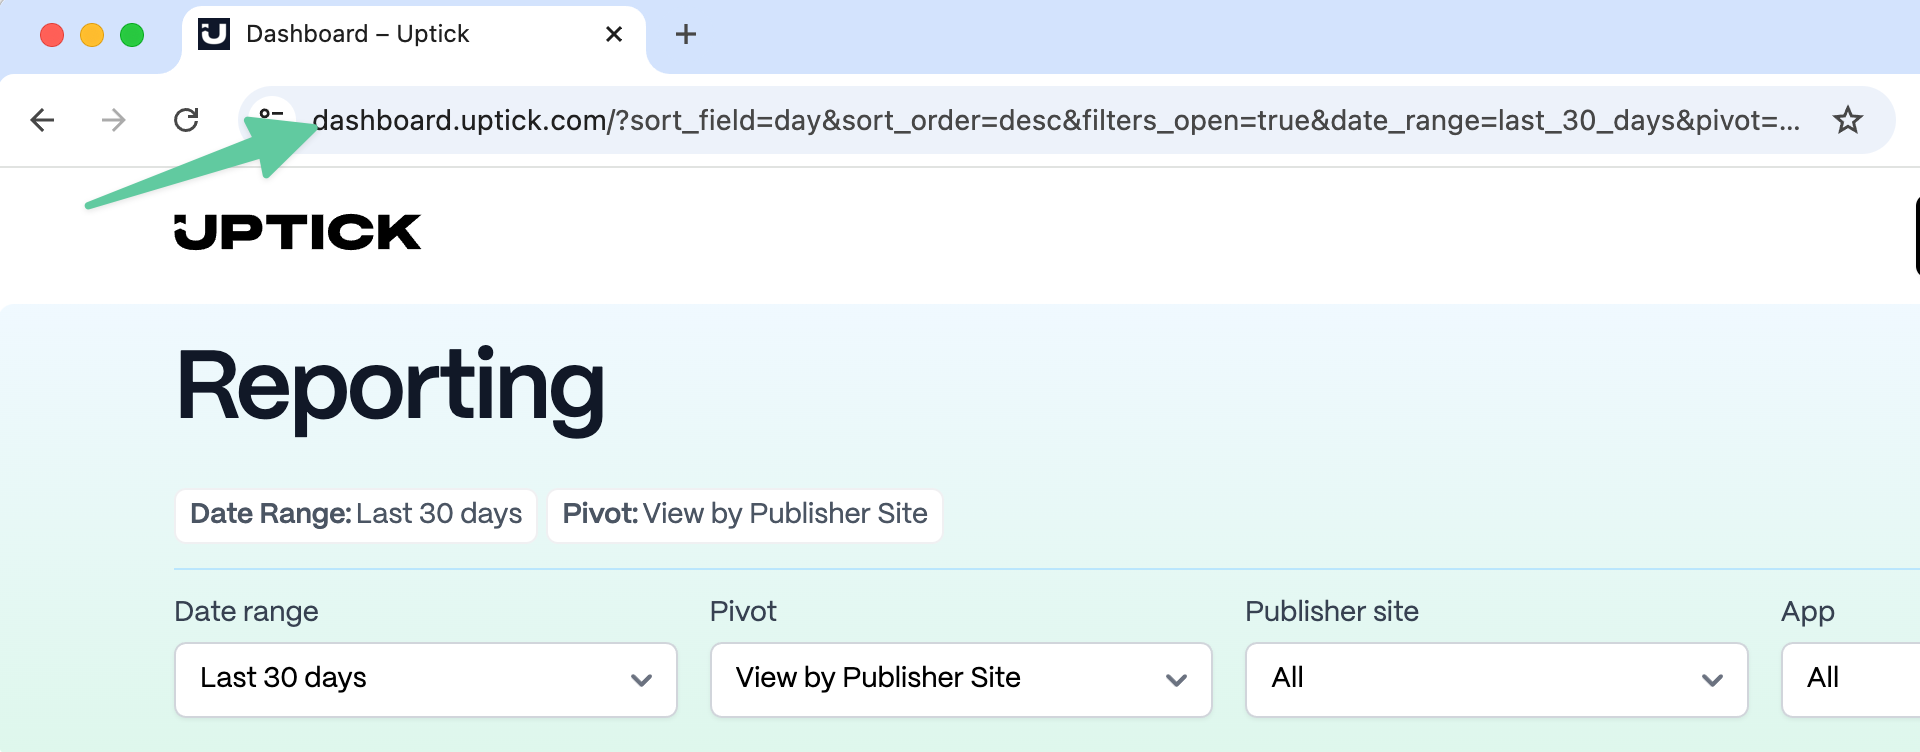
With your token ready, proceed to the Dashboard :
- Adjust filters and formats to display the data as you want to retrieve it via the API.
- Once the data view is configured to your preference, copy the URL from your browser’s address bar. This URL will serve as the base request URL for your API call.
Step 4: Request Data Through the API
To request data, use the Dashboard URL and authenticate using one of the methods below:
Authentication Methods
Preferred Method: Authorization Header
Use the Authorization header with Basic authentication and the Accept header to specify JSON format. Base64 encode your token followed by :X and include it in the header:
# Base64 encode YOUR_AUTH_TOKEN:X
echo -n "YOUR_AUTH_TOKEN:X" | base64

# Use in your request
curl -H "Authorization: Basic BASE64_ENCODED_STRING" \
     -H "Accept: application/json" \
     "https://dashboard.uptick.com/?sort_field=impressions&sort_order=desc"
Alternative Method: URL Parameter (Not Recommended)
You can include the auth_token parameter in the URL, but this is not recommended as it could leak credentials in logs or browser history:
{url}&format=json&auth_token={authentication_token}
Example
If your Dashboard URL is:
https://dashboard.uptick.com/?sort_field=impressions&sort_order=desc
and your token is:
token_1234
Using Authorization Header (Recommended):
# Base64 encode token_1234:X
echo -n "token_1234:X" | base64
# Result: dG9rZW5fMTIzNDpY

curl -H "Authorization: Basic dG9rZW5fMTIzNDpY" \
     -H "Accept: application/json" \
     "https://dashboard.uptick.com/?sort_field=impressions&sort_order=desc"
Using URL Parameter (Not Recommended):
https://dashboard.uptick.com/?sort_field=impressions&sort_order=desc&format=json&auth_token=token_1234
Response Format
The API response will include the following components:
- summary: Aggregated totals for the data.
- data: Individual row-level data.
- pagination: Information on paging, including the
next_page_urlfor retrieving subsequent data.
Example Response
{
  "summary": {
    "week": null,
    "views": 28499,
    "impressions": 80959,
    "clicks": 10713,
    "ctr": 10.69,
    "actions": 1769,
    "cvr": 4.35,
    "revenue": "9229.37",
    "rpi": 0.21,
    "rpv": 0.35,
    "cpa": 44.79
  },
  "data": [
    {
      "week": "2025-01-13",
      "views": 17029,
      "impressions": 98448,
      "clicks": 1647,
      "ctr": 10.91,
      "actions": 938,
      "cvr": 4.33,
      "revenue": "2225.02",
      "rpi": 0.21,
      "rpv": 0.36,
      "cpa": 45.02
    },
    {
      "week": "2025-01-20",
      "views": 11470,
      "impressions": 82511,
      "clicks": 9066,
      "ctr": 10.45,
      "actions": 831,
      "cvr": 4.36,
      "revenue": "7004.35",
      "rpi": 0.2,
      "rpv": 0.33,
      "cpa": 44.53
    }
  ],
  "pagination": {
    "current_page": 1,
    "total_pages": 2,
    "results_per_page": 25,
    "next_page_url": "https://dashboard.uptick.com/...next_url_path"
  }
}
Available Metrics
As a partner, your API responses will include the following metrics:
| Metric | Description |
|---|---|
transactions |
Total number of transactions (offer views that led to user engagement) |
clicks |
Number of clicks on offers |
partner_revenue |
Revenue generated for your partnership |
partner_rpt |
Revenue per transaction |
Available Filters
Partners can use the following filters in their API queries by adding the appropriate parameters to the URL.
Date Range Filter
Control the time period for your data using the date_range parameter:
Predefined Options:
today- Today’s datayesterday- Yesterday’s datalast_7_days- Last 7 days (does not include today)last_30_days- Last 30 days (does not include today)last_90_days- Last 90 days (default for partners, does not include today)this_month- Current monthlast_month- Previous monththis_year- Current yearlast_year- Previous yearcustom- Custom date range (requires additional parameters)
Custom Date Range:
When using date_range=custom, you can specify:
date_from- Start date (YYYY-MM-DD format, required)date_to- End date (YYYY-MM-DD format, required)time_from- Start time (HH:MM:SS format, optional). Times are interpreted as UTC.time_to- End time (HH:MM:SS format, optional). Times are interpreted as UTC.
Validation Rules:
- date_to must be the same as or later than date_from.
- If date_from or date_to is missing, the API will return an error with a 400 status code and a descriptive message.
- If time_from or time_to is missing, the API will default to 00:00:00 for time_from and 23:59:59 for time_to.
Examples:
# Last 7 days
https://dashboard.uptick.com/?date_range=last_7_days

# Custom date range
https://dashboard.uptick.com/?date_range=custom&date_from=2025-01-01&date_to=2025-01-31

# Custom date and time range
https://dashboard.uptick.com/?date_range=custom&date_from=2025-01-15&date_to=2025-01-15&time_from=09:00:00&time_to=17:00:00
Pivot Filter
Change how your data is grouped and presented using the pivot parameter:
Available Pivot Options for Partners:
| Pivot Value | Description |
|---|---|
publisher_site |
Group by publisher site (default) |
publisher_site_domain |
Group by publisher site domain |
app |
Group by app |
day |
Group by day |
environment |
Group by environment (production/staging) |
Examples:
# Group data by publisher site
https://dashboard.uptick.com/?pivot=publisher_site

# Group data by app
https://dashboard.uptick.com/?pivot=app

# Group data by publisher site domain with last 30 days
https://dashboard.uptick.com/?date_range=last_30_days&pivot=publisher_site_domain

# Group data by environment
https://dashboard.uptick.com/?pivot=environment
Publisher Site Filter
Filter data for specific publisher sites using the publisher_site parameter. This filter supports multiple selections:
publisher_site[]- Array of publisher site IDs to include- Use
"unknown"to filter for events without an associated publisher site
Examples:
# Filter for specific publisher site
https://dashboard.uptick.com/?publisher_site[]=123

# Filter for multiple publisher sites
https://dashboard.uptick.com/?publisher_site[]=123&publisher_site[]=456

# Filter for unknown publisher sites
https://dashboard.uptick.com/?publisher_site[]=unknown
Publisher Site Domain Filter
Filter data by publisher site domain using the publisher_site_domain parameter:
Examples:
# Filter for specific domain
https://dashboard.uptick.com/?publisher_site_domain[]=example.com
App Filter
Filter data for specific apps using the app parameter. This filter supports multiple selections:
app[]- Array of app IDs to include- Use
"unknown"to filter for events without an associated app
Examples:
# Filter for specific app
https://dashboard.uptick.com/?app[]=123

# Filter for multiple apps
https://dashboard.uptick.com/?app[]=123&app[]=456

# Filter for unknown apps
https://dashboard.uptick.com/?app[]=unknown
App External IDs Filter
Filter data by external app identifiers using the app_external_ids parameter:
Examples:
# Filter by external app ID
https://dashboard.uptick.com/?app_external_ids[]=external_123
Environment Filter
Filter data by environment using the environment parameter:
Available Options:
| Environment Value | Description |
|---|---|
production |
Production environment traffic only |
staging |
Staging environment traffic only |
Examples:
# Filter for production only
https://dashboard.uptick.com/?environment=production

# Filter for staging only
https://dashboard.uptick.com/?environment=staging
Placement Filter
Filter data by placement (where offers are shown) using the placement parameter:
Examples:
# Filter for order confirmation placement
https://dashboard.uptick.com/?placement=order_confirmation

# Filter for all placements (default)
https://dashboard.uptick.com/?placement=all
Combining Filters
You can combine multiple filters in a single API request:
# Last 7 days, grouped by app, filtered for specific apps
https://dashboard.uptick.com/?date_range=last_7_days&pivot=app&app[]=123&app[]=456

# Custom date range, grouped by publisher site
https://dashboard.uptick.com/?date_range=custom&date_from=2025-01-01&date_to=2025-01-31&pivot=publisher_site

# Production only, grouped by day
https://dashboard.uptick.com/?environment=production&pivot=day&date_range=last_30_days
Sorting and Pagination
Control result ordering and pagination:
| Parameter | Description |
|---|---|
sort_field |
Field to sort by (e.g., transactions, clicks, partner_revenue) |
sort_order |
Sort direction (asc or desc) |
page |
Page number for pagination |
Note: By default, partner data is sorted by transactions in descending order. When using a date-based pivot (e.g., day), results are sorted by date in descending order.
Complete Example:
https://dashboard.uptick.com/?date_range=last_30_days&pivot=app&app[]=123&sort_field=partner_revenue&sort_order=desc
Quick Reference
Partner-Specific Defaults
When no parameters are specified, partners see data with these defaults:
| Setting | Default Value |
|---|---|
| Date Range | Last 90 days |
| Pivot | Publisher Site |
| Placement | All |
| Sort Field | Transactions |
| Sort Order | Descending |
Complete Parameter Reference
| Parameter | Type | Description |
|---|---|---|
date_range |
string | Predefined date range or custom |
date_from |
date | Start date (YYYY-MM-DD) for custom range |
date_to |
date | End date (YYYY-MM-DD) for custom range |
time_from |
time | Start time (HH:MM:SS) for custom range |
time_to |
time | End time (HH:MM:SS) for custom range |
pivot |
string | Primary grouping dimension |
publisher_site[] |
array | Publisher site IDs to filter |
publisher_site_domain[] |
array | Publisher site domains to filter |
app[] |
array | App IDs to filter |
app_external_ids[] |
array | External app IDs to filter |
environment |
string | Environment to filter (production or staging) |
placement |
string | Placement to filter |
sort_field |
string | Field to sort by |
sort_order |
string | Sort direction (asc or desc) |
page |
integer | Page number for pagination |
By following these steps, you can retrieve, filter, and utilize your Dashboard data seamlessly using Uptick’s API.